Recommended Sites


STAR TREK Modeling: A Brief History of the Shuttlecraft Galileo Pt. 5
Thank for returning for this final chapter in Round 2 consultant, Gary Kerr’s, history on the Galileo shuttle.
A Brief History of the Shuttlecraft Galileo Pt. 5 By Gary Kerr
Rescue and Rebirth
The whereabouts of the Galileo were unknown, and fans despaired that it had been scrapped, but the plucky shuttlecraft resurfaced in 2012, when Kiko Auctioneers held an 11-day online auction. The auction price was holding at around $20,000, but on June 28, 2012, the bidding came to a head when three bidders jumped in during the last 90 seconds of the auction. Adam Schneider, a collector of numerous Star Trek studio miniatures, placed the winning bid of $70,150.00, and the Galileo became by far the largest spaceship model in his collection.
Since the Galileo was far too large to display at Adam’s home in New Jersey, Adam’s goal was to completely restore the rotting prop and donate it to a museum for public display. Gene Winfield, who had originally built the Galileo, suggested that a builder of wooden boats might be best suited for the job, and Adam selected Master Shipwrights Design and Restoration, which specialized in restoring antique and classic boats, to do the restoration. The Galileo was trucked to Master Shipwrights in Atlantic Highlands, NJ, but six days later, on October 29, 2012, disaster struck, as Hurricane Sandy slammed into the East Coast. In anticipation of a storm surge, the mock-up’s nacelles were placed in a high and dry location, while the mock-up, itself, sat on 12” blocks. Sandy’s storm surge flooded Master Shipwrights’ shop with four feet of water, but the Galileo survived. As Adam said, the mock-up was already such a hunk of junk that the floodwater couldn’t hurt it any further.
Over the next two months, the shop’s employees de-salted the shop and the mock-up, and then they went to work on the Galileo.
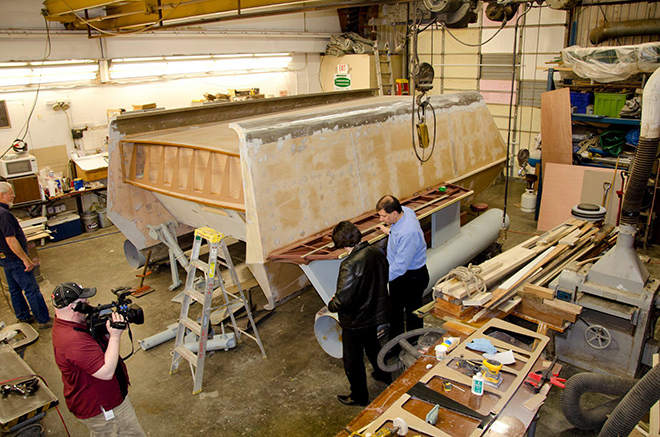
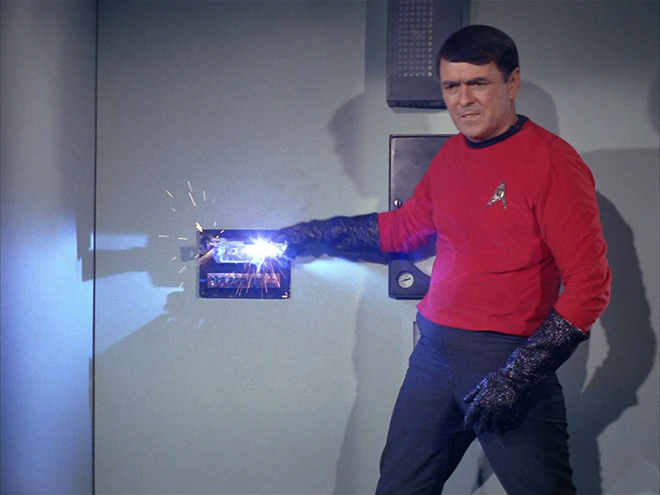
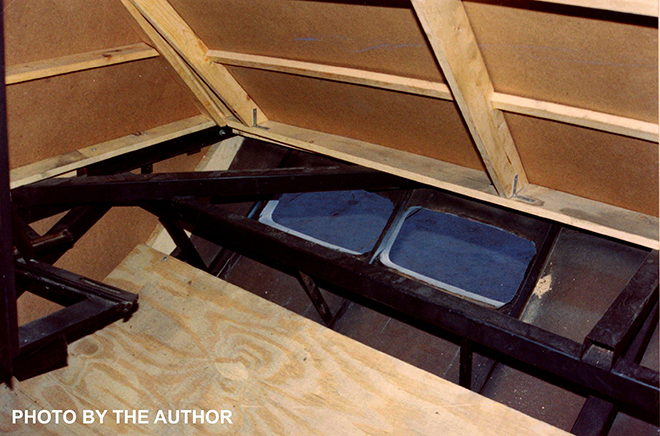
After they straightened and repaired the ship’s internal metal skeleton, they replaced the rotted framing with all-new wood. Lift points were added so the heavy mock-up could be moved safely. Sturdy Marine-grade plywood replaced the flimsy Masonite, and the finished shuttle was painted with marine-grade paint. I supplied artwork for the external markings, plus additional information, and Will Smith built a replacement “busy box”, a collection of gizmos hidden behind a fold-down panel on the aft end of the shuttle, which Spock and Scotty would work on every time the shuttle got stranded on an alien world.
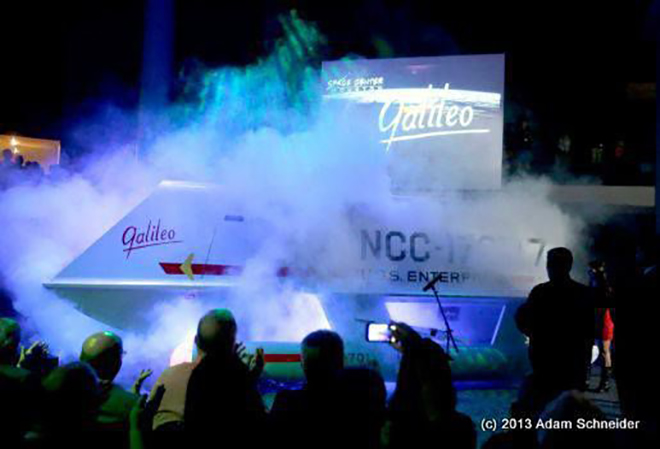
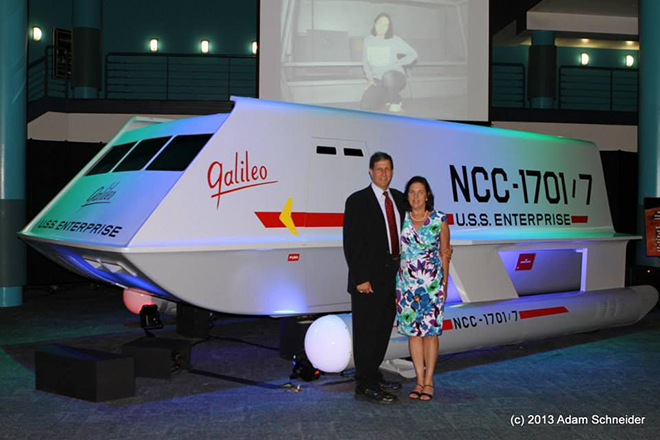
Once the Galileo was fully restored, Adam set about finding a suitable museum to house the ship. Display space, especially for an artifact as large as the Galileo, is at a premium in most museums, and after contacting over a dozen museums, Adam settled on NASA‘s Space Center Houston, which is part of the Johnson Space Center. The Galileo was unveiled, amid much ceremony, on July 31, 2013.
In 2016, the Galileo was loaned to the Intrepid Sea, Air & Space Museum in New York City, and upon its return to Houston, the shuttle was ignominiously displayed in a corner of the museum’s cafeteria.
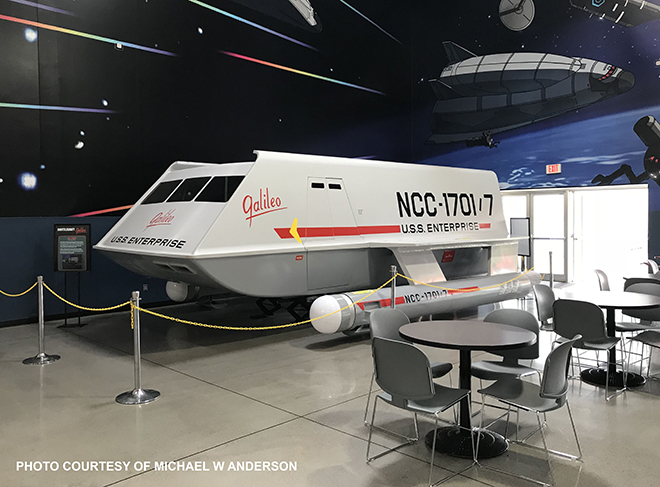
The current management team at the museum is apparently not a fan of Star Trek. The Galileo has been removed from public display and put into storage because it does not fit into management’s “vision” for the museum.
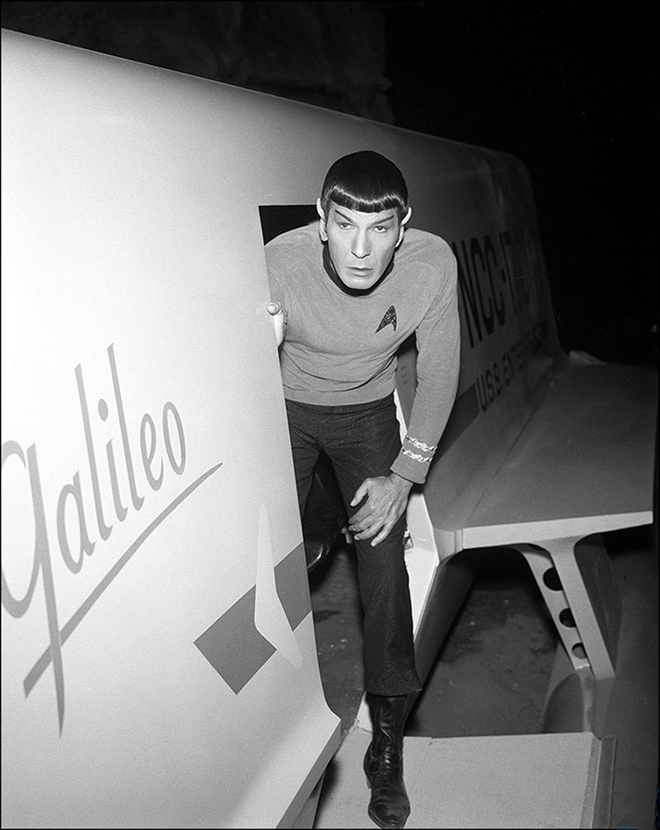
The Filming Miniature
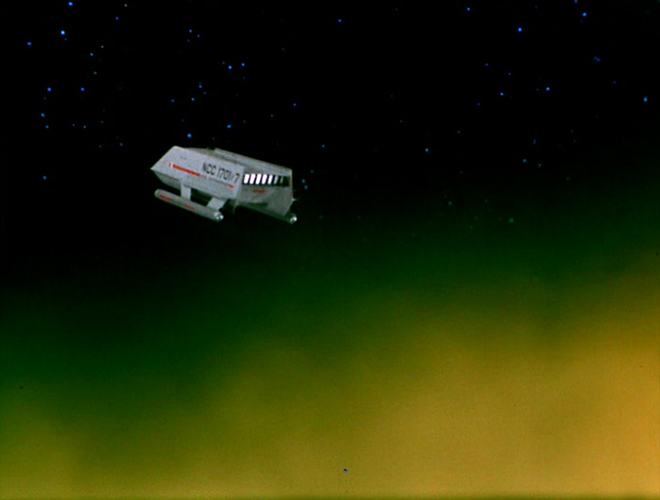
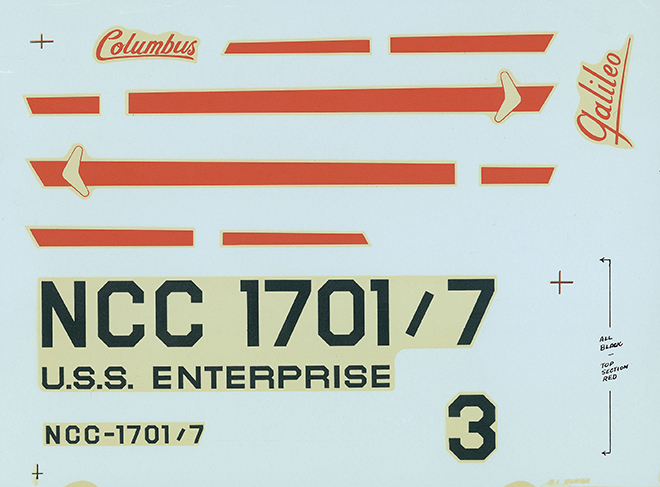
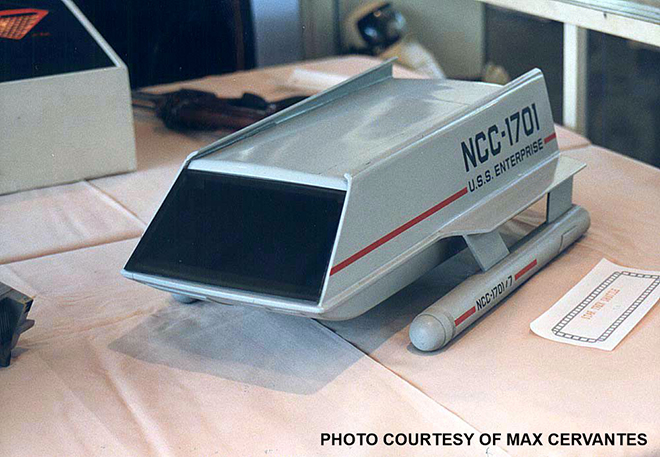
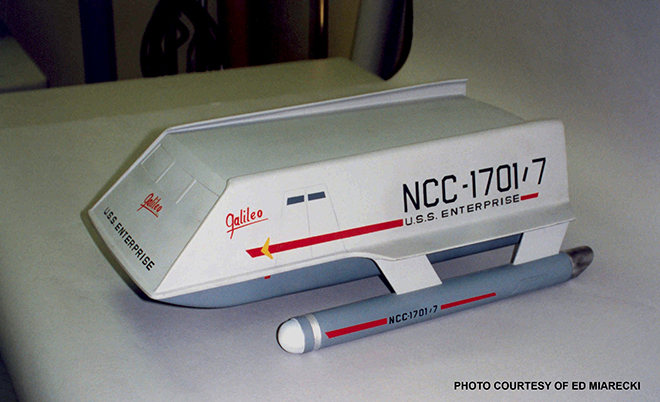
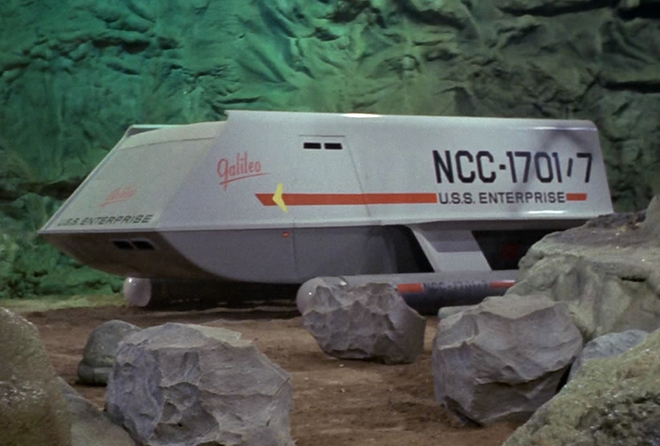
In contrast to its widely-traveled big brother, the 22-inch Galileo miniature was a relative shut-in and remained in the Los Angeles area for most of its existence. The model, constructed mainly from wood and plastic, was designed to be filmed either suspended from wires, or mounted on a post inserted into the model’s belly. The studio model also had internal lighting for its impulse deck and front windows. Richard Datin had decal sheets with markings for both the Galileo and Columbus, but only the Galileo markings were ever applied to the model.
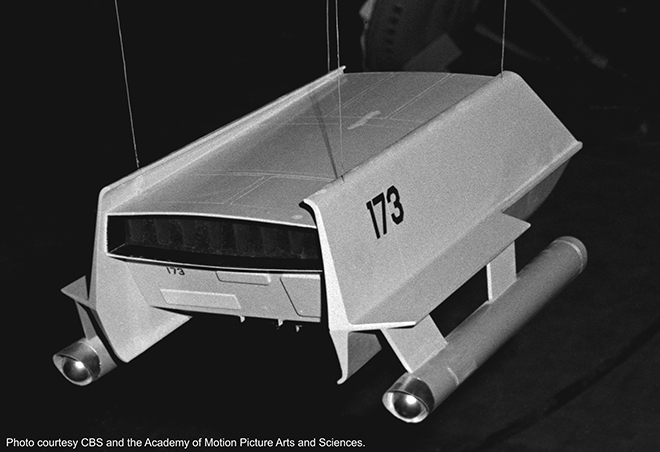
One of the model’s features has been overlooked until recently. In 2019, Star Trek authority, Doug Drexler, and aerospace historian and writer, Glen Swanson, had been sleuthing through the archives at UCLA and AMPAS (Academy of Motion Picture Arts and Sciences). Doug and Glen hit pay dirt, we were able to use Doug’s Academy Award winner discount to get 600 dpi scans of previously unreleased photographs (not grainy film clips) of the studio model of the Enterprise, plus shots of the newly built Galileo miniature before it was fully detailed. The model, suspended from overhead wires, had a glossy, 2-tone paint scheme, and apparently to serve as Commodore Mendez’s shuttle in “The Menagerie, Pt 1”, somebody had plastered “173” in large letters on the model’s side. Richard Datin worked on the model for several hours on October 31, 1966, and this may have been when the Galileo’s official markings were applied.
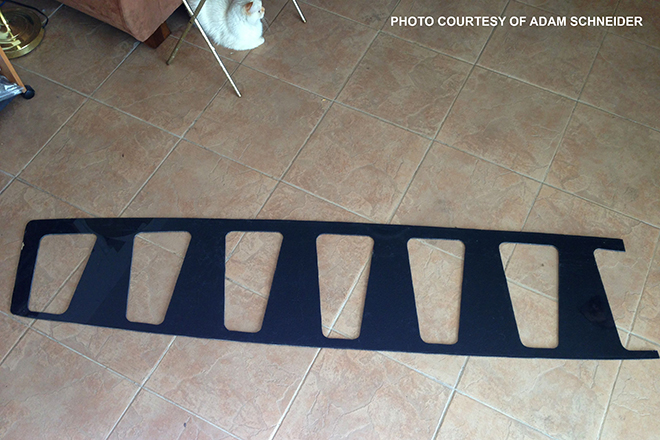
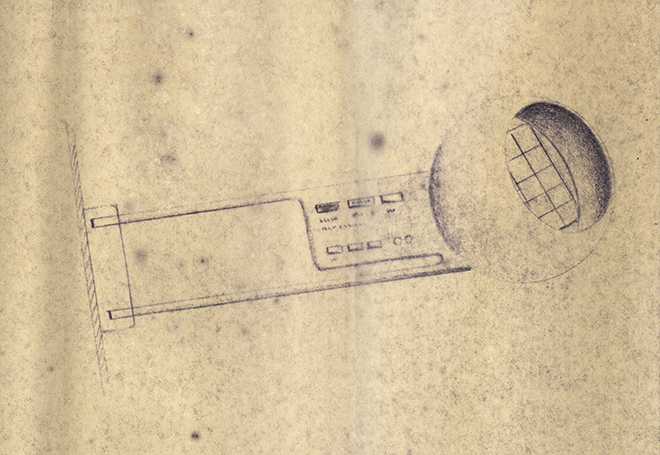
The most important discovery lay on the model’s wooden roof: the existence of scribed panels. They were very similar to the panels on the concept illustration that Thomas Kellogg had drawn for Gene Winfield and Matt Jefferies in 1966, when an affordable version of the Galileo was first being designed.
The 22-foot mock-up did not possess corresponding roof panels, which makes financial sense. Because the roof of the mock-up was seen only one time in the series, in a wide establishing shot in “The Galileo Seven”, it seems reasonable did not want to waste their budget dollars on full-size panels.
The model vanished after the series ended, and was presumed to be lost, stolen, or destroyed during a cleanup at Paramount in 1973. In 1987, though, the Galileo model unexpectedly reappeared. As long-time scenic art supervisor and Trek historian, Michael Okuda, explained, Set Decorator John Dwyer found the shuttlecraft miniature in storage at Paramount. He brought it up to the Art Department, plopped it onto Mike’s desk, and asked, “Do you know what this is?”
The Galileo was in pretty poor shape. The entire front bulkhead (the panel with the windows) was missing, and overall surface was cracked pretty badly. The nacelles, themselves, were broken off, and the corrugated cowlings on the ends of the nacelles were missing.
Dwyer took the model down to the effects shop to have it refurbished. They did a decent job, considering that they were undoubtedly rushed, and probably didn’t have any reference to work from, except the prop itself. The most significant error that they made was that the front panel, instead of being replaced with a new solid piece with three windows, was replaced with a single piece of dark Plexiglas “window”. The model also lost its 2-tone paint scheme.
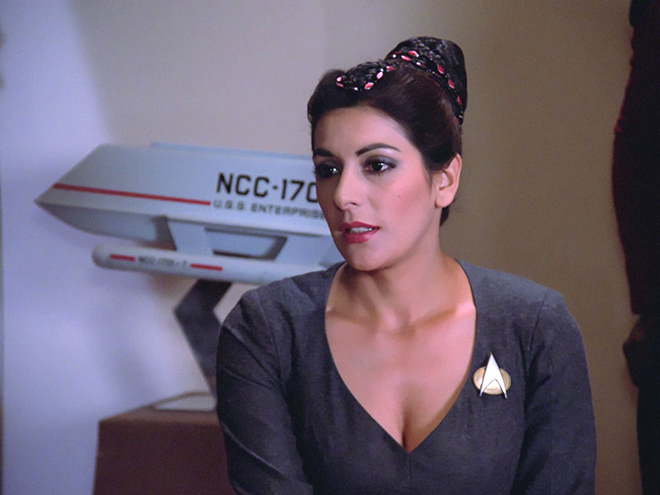
Dwyer used the model as set dressing in Riker’s quarters in the 7th episode of the first season of Star Trek: The Next Generation, “Lonely Among Us“, which was filmed from August 26-September 3, 1987.
Early the following year, master model maker Greg Jein, who had begun to refurbish the model, loaned it to the local “Equicon ’88 Science Fiction Convention“, where it was on display from April 1-3, 1988.
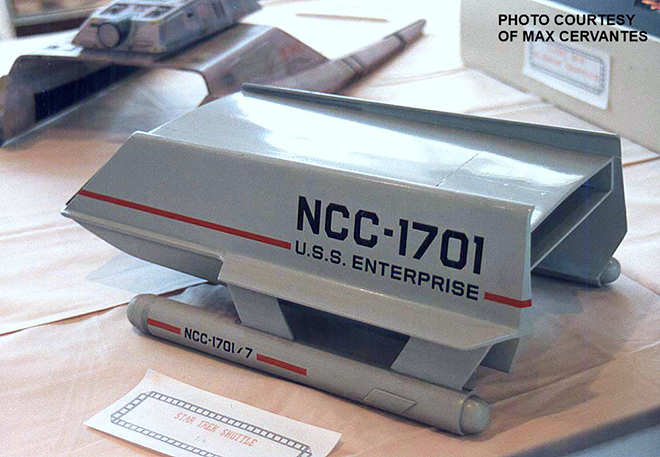
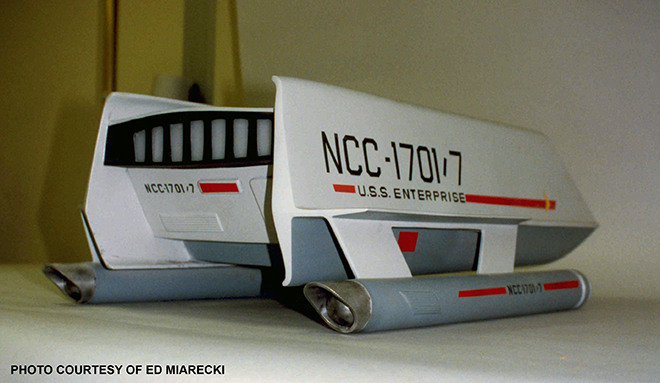
Afterwards, Greg Jein finished restoring the model to its original appearance, sans landing gear. Greg noted that before he restored the model, you could see straight through it, from front to back. During the restoration, Greg gave the model something that it had never had, a dash between the large “NCC” and “1701” on the side of the ship. The dash had accidentally been omitted from the 1966 decal sheet, and a quarter-century later, that oversight was remedied.
In 1992, Paramount loaned the Galileo model to the Smithsonian for their 1992-93 Star Trek exhibition.
The model’s last public appearance was in 1993-94 at an exhibition at the Hayden Planetarium in New York City.
Epilog
Against all odds, both of the original Galileos have survived over 50 years of rain, sun, floods, crushing, and neglect. With any luck, they’ll be around for many more years to come.
Thank you, Gary, for all of the work you put into this special blog series. Until next time, live long and prosper!
All images courtesy of CBS, except where noted.
TM & (C) 2020 CBS Studios Inc. ARR.
STAR TREK Modeling: A Brief History of the Shuttlecraft Galileo Pt. 4
The story of the Galileo shuttle by Round 2 consultant, Gary Kerr, continues…
A Brief History of the Shuttlecraft Galileo Pt. 4 By Gary Kerr
Turning Back the Clock
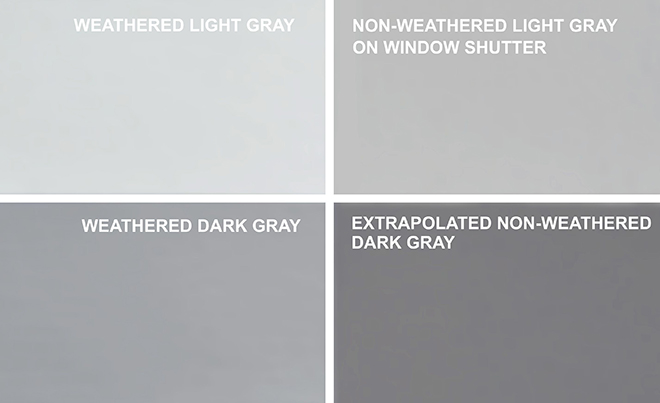
The Galileo mock-up sported a glossy, 2-tone exterior color scheme – lighter gray above and darker gray below – but the exact shades of gray were thought to be lost to time since the original paint had faded after decades of exposure to the elements. In 2015, I’d made a color match for the weathered light gray paint that was on a fragment of the Galileo owned by Adam Schneider (more on him later). I also had a sample of the weathered darker gray from the lower half of the mock-up. I now had samples of the original light and dark gray paint, but I had no way of knowing how much the original paints had faded.
The situation changed when I acquired the original window shutter for the Galileo’s “driver’s side” front window. The shutter is a low-tech affair: a beat-up piece of Masonite with a wooden frame in back.
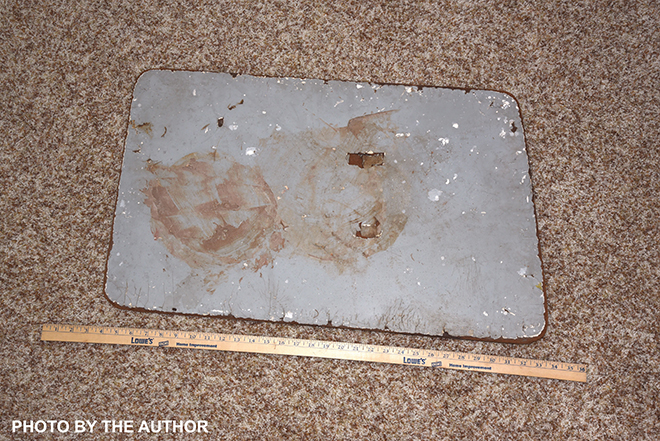
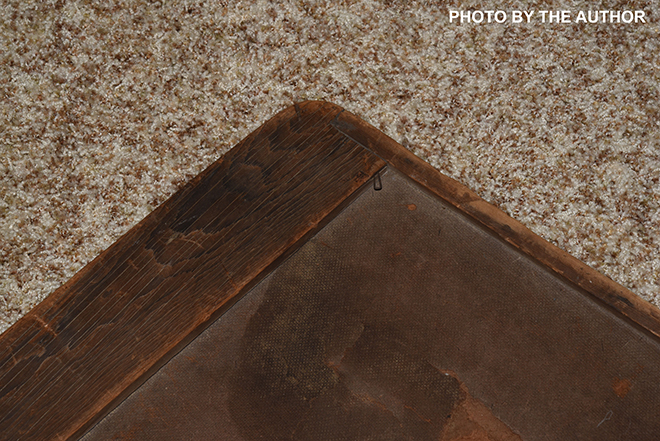
The shutter did not slide up and down, but was simply placed into the window opening on the shuttle. There were a number of spots where three layers of paint were exposed: a white primer base coat, a light gray middle layer, and a darker gray top coat. The top coat had almost certainly been applied by Trek fans during a restoration, but the middle layer was an exact match for the weathered light gray that I had examined in 2015. I wanted to expose more of the light gray middle layer, so I began to carefully chip away the brittle top layer of paint with an X-Acto blade. To my surprise, the freshly exposed paint, which had been protected from the sun by the fan-applied paint, was a couple shades darker than Adam Schneider’s sample. The paint was a good match for Pratt & Lambert’s “Half-tone”, which the Smithsonian’s paint expert, Dave Wilson, had identified in 2016 as the color of the gray trim under the front ends of the nacelles on the 11-foot original Enterprise model. Very interesting…
I now had samples of the weathered light and dark gray paints, plus the relatively unweathered light gray paint from the shutter. If the original light gray paint had faded by X amount over the years, could I arrive at an approximation of the original dark gray paint by darkening my faded dark gray sample by X amount?
I had the paint store do a color match on my weathered dark gray sample, and then darken the paint by a couple shades. My recreation of the unweathered dark gray was a good match for Pratt & Lambert’s “Gettysburg”, which the Smithsonian’s Dave Wilson, had matched to the color of the impulse deck and inboard nacelle trenches on the 11-foot Enterprise. My conclusion: it appears that that Matt Jefferies had selected two shades of gray trim from the Enterprise for use on the Galileo’s outer hull.
The Galileo mock-up first appeared before the cameras for “The Galileo Seven” on September 27, 1966. Two weeks later, October 12, 1966, the Galileo portrayed an anonymous shuttlecraft from Starbase 11 in “The Menagerie, Part 1”. Even though “The Galileo Seven” was filmed first, the episode was delayed, presumably by the wait for the hangar bay miniature to be built and filmed, and wasn’t aired until January 5, 1967. Thus, the Galileo’s first onscreen appearance occurred on November 17, 1966, in “The Menagerie, Part 1”.
During the run of the series, the full-size exterior and/or interior props also made appearances in “Metamorphosis”, “The Doomsday Machine“, “Journey to Babel“, and “The Immunity Syndrome“, with its farewell performance in “The Way to Eden”.
Life After Star Trek
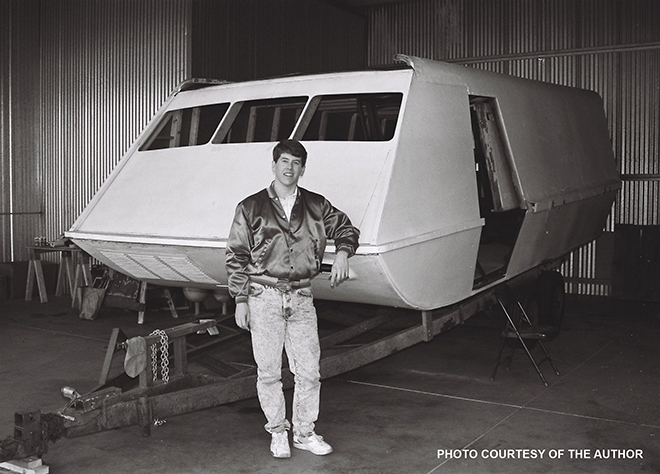
After the original series ended, the Galileo began a years-long, cross-country odyssey. Paramount donated the 22-foot Galileo mock-up to The Braille Institute in Los Angeles. The Masonite, plywood, and metal prop was not designed to withstand the elements, and once outdoors, it began to deteriorate. Because of safety concerns, the institute sold the prop to Roger Hiseman of Palos Verdes, who displayed the decomposing shuttlecraft, a photo op for young Trek fans, in his front yard. Following complaints from his neighbors, the Galileo was moved to an open storage area in Redondo Beach.
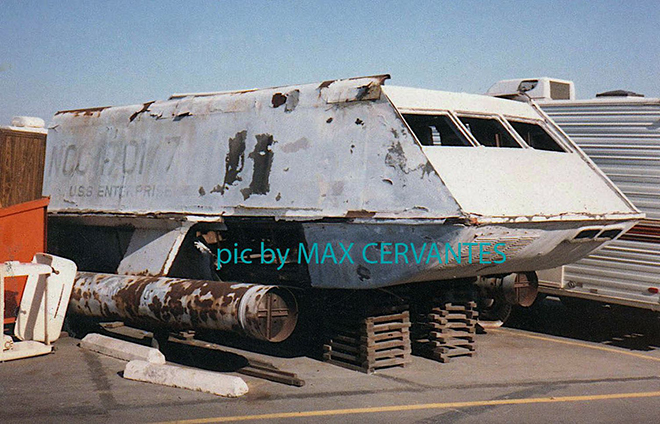
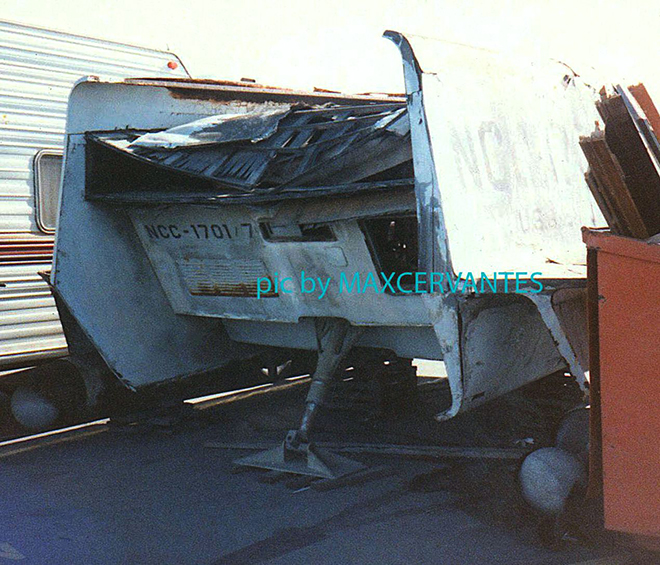
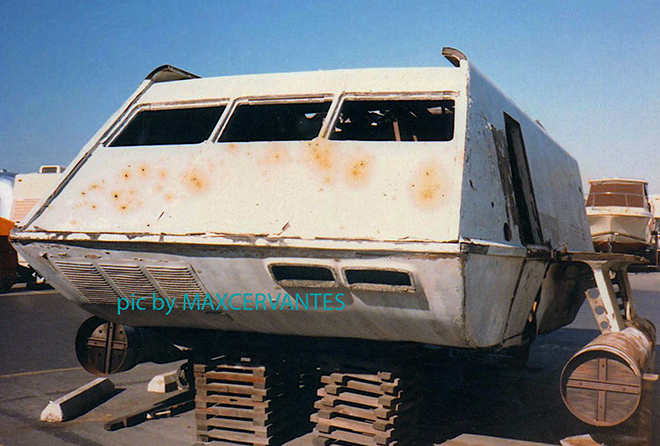
By this time, the mock-up was looking MUCH worse for the wear, and the roof over the impulse deck had collapsed. The Galileo changed hands again in 1985 and ended up further south, to another open storage area near San Diego, where the mock-up’s owner attempted a restoration. Following an appearance at a 1986 Star Trek convention in Anaheim, the mock-up was moved to yet another open storage area, this time near Palm Springs, and the semi-restored mock-up continued to deteriorate.
In 1989, a Star Trek fan in Ohio, Lynne Miller, purchased the mock-up for $3,000 and had it shipped over to the Canton/Akron airport in April 1991. After many years, the mock-up finally had a roof over its head. Yet another restoration was begun, and the Galileo was displayed at a Trek convention near Cleveland the following November.
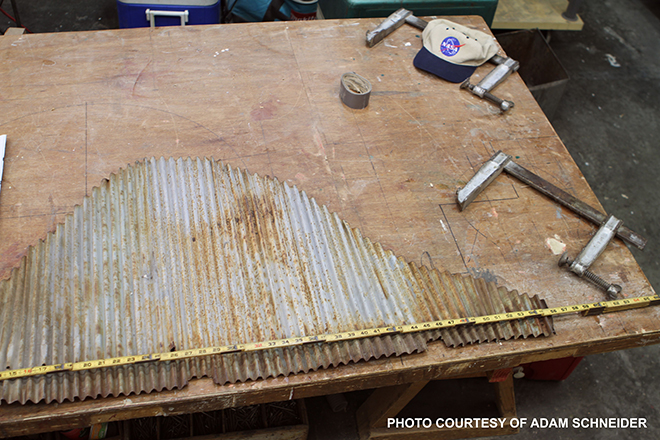
As mentioned previously, in April 1992, on the way home from visiting the hugely popular Star Trek: The Exhibit at the National Air and Space Museum in Washington DC, a couple friends and I rendezvoused with Lynne Miller at the Canton/Akron airport and spent several hours documenting the mock-up. I took home a couple souvenirs, including an 8 ft roof truss, from a pile of rotting wood that had been removed from the mock-up.
The restoration stopped in 1993, following a dispute between Ms Miller and those doing the restoration. The Galileo had to be moved yet again when the airport property was sold and the hangar was demolished, and it ended up in open storage at an industrial site near Akron. The mock-up dropped out of sight when the property was sold and cleaned up in 2008.
What a shocking turn of events! The Galileo straight up disappeared! Find out what happened next in the Earth-shattering conclusion to Gary’s story.
All images courtesy of CBS, except where noted.
TM & (C) 2020 CBS Studios Inc. ARR.
STAR TREK Modeling: A Brief History of the Shuttlecraft Galileo Pt. 3
Welcome back for our continuing series of Galileo articles by Round 2 consultant Gary Kerr.
A Brief History of the Shuttlecraft Galileo Pt.3 By Gary Kerr
The Inside Job
The set representing the Galileo’s interior was constructed simultaneously with the exterior mock-up. To facilitate filming with the large, bulky movie cameras, the walls and front bulkhead were ‘wild’; that is, they could be rolled out of the way, as required, for filming various camera angles. In a major deviation from an interior that would actually fit inside the shuttlecraft, the ceiling was raised so the actors could stand erect without bumping their heads on the ceiling. An overhead light panel ran the length of the passenger compartment, and the plastic grid inside the panel’s frame could be removed to allow the use of overhead studio lights.
The flight controls and computers were rudimentary, and were primarily designed to give the impression of high-tech instrumentation, with actors being the center of attention. To save money, the “computer” props were reused as set dressing in other episodes of the show. I’m quite sure that nobody involved in the production had the foggiest idea that anybody would be examining their work, frame-by-frame and in high def over a half century later.
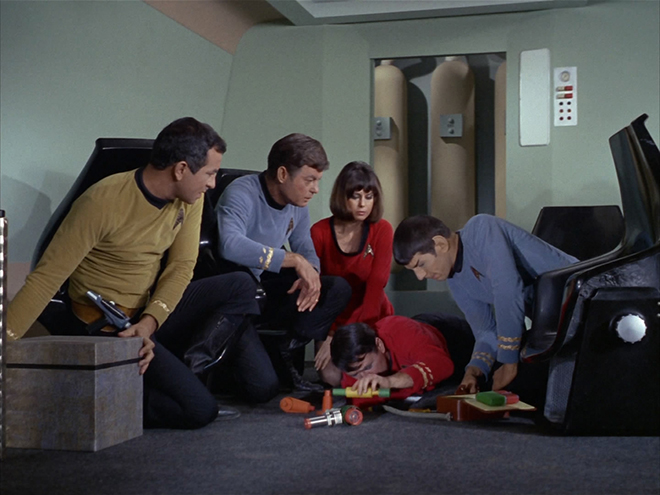
The aft compartment was something else altogether, since it changed size and shape in every scene. For example, in “The Galileo Seven”, there’s a dramatic close-up as the crew members watch Scotty drain a phaser to recharge the ship’s power. The yellowish tanks in the aft compartment are artfully framed just inside the rear doorway. But when Scotty goes in back to shock the ape monsters that are threatening them, the aft compartment has at least quadrupled in size, and the yellow tanks are nowhere in sight.
The audience didn’t realize it at the time, but we got a sneak-peek at the tanks before they were installed in the Galileo when they were turned upside-down to serve as phaser coolant tanks in “Balance of Terror”.


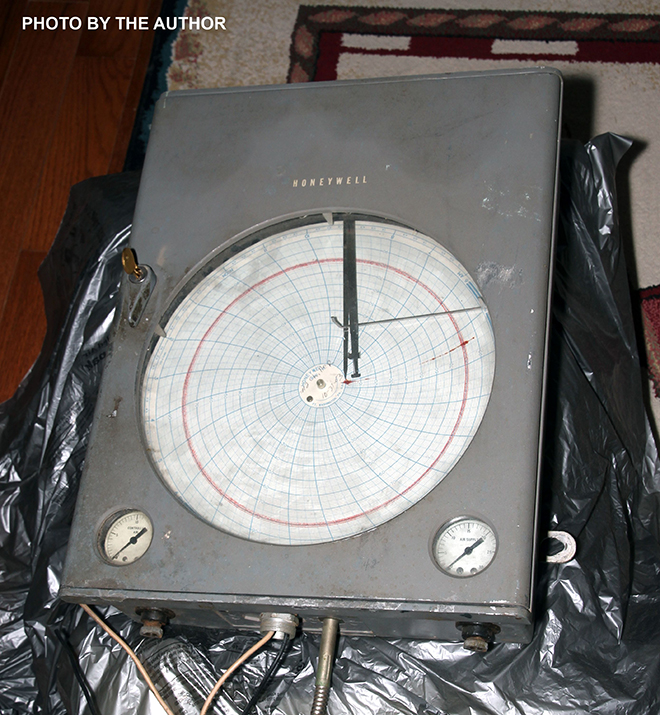
The starboard wall had several gizmos affixed to it, including an instrument that looks somewhat like a wall clock. In real life, it was a repurposed Honeywell chart recorder, with the name “Honeywell” covered over.
It appears that there was no port wall, wild or otherwise, in the aft compartment. In fact, if you carefully examine the scene in “The Galileo Seven” in which the camera shakes while the monsters attack the shuttle, you can actually see the soundstage for a split-second where the left wall should be.
On August 15, 1966, Jefferies flew out to the Phoenix shop for a quick, one-day inspection, leaving LA on Continental Airlines flight #68, and returning on Western Airlines flight #624. Total cost: $54.29. Those were the days!
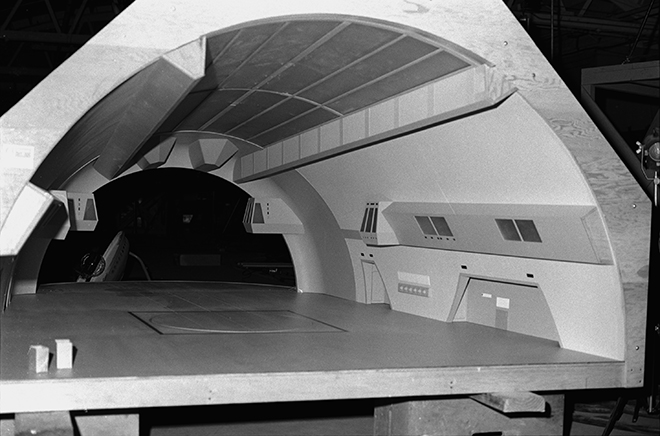
With the mock-up and miniature Galileo under construction, the production needed a hangar bay to park the shuttle in. Richard Datin, who had built the 3 ft Enterprise model and supervised construction of the 11-footer, built the miniature hangar bay set in his garage workshop at 4146 Klump Ave, in North Hollywood, near Studio City, California. Datin began construction on Sept 14, 1966, and completed the project on Oct 25, 1966. Constructed with pine framing, Masonite floor & walls, and Plexiglas ceiling & windows, the 1/12 scale model was 122” long. The forward end of the model was 76” wide and 38” high, while the aft end was 60” wide and 29” high. Total cost of the model: $2138.00.
Once Winfield’s shop had finished their part of building the interior & exterior props, along with the 22” miniature, the unfinished components were trucked to the studio in LA, where union craftsmen did the final painting and detailing, and added electronics to the interior set.
Next time, Gary takes a look at the filming miniature and paint colors. See you then!
All images courtesy of CBS, except where noted.
TM & (C) 2020 CBS Studios Inc. ARR.
STAR TREK Modeling: A Brief History of the Shuttlecraft Galileo Pt.2
In part 2 of Gary Kerr’s article on the background of the Galileo shuttle, he explores the construction of the miniature and set mockups. Let’s dig in…
A Brief History of the Shuttlecraft Galileo Pt.2 By Gary Kerr
The 22-Footer Takes Shape
Once the Galileo’s final design had been hashed out, construction began in earnest at Gene Winfield’s shop in Phoenix. The target date for completion of the interior set was September 6, 1966, with a target date of September 12 for the exterior prop.
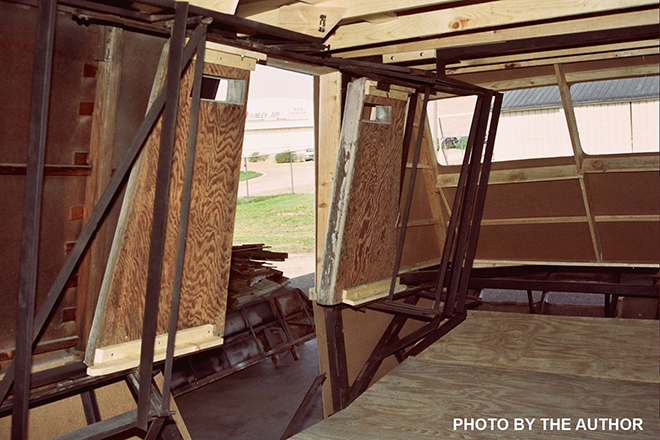
The Galileo mock-up was essentially a sturdy metal skeleton sheathed in wood. The lower half of the prop’s skeleton was made from welded 2” square steel tubing, while the upper half was framed in wood.
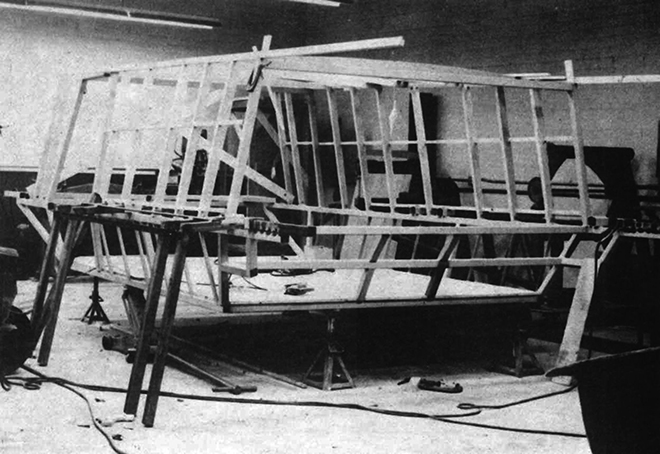
A Masonite skin was applied over the skeleton, and fiberglass cloth covered the Masonite. The internal floor was made from a sheet of plywood. To avoid unwelcome reflections in the front windows, they had no glass. Instead, simulated window shutters, consisting of a sheet of Masonite backed by a wooden frame, were inset into the window openings. Curved fins along the upper and lower edges of the hull were made from sheet metal. A bulky metal framework inside the shuttle allowed a technician to operate the 3-piece side door.
The warp nacelle/wing assemblies were designed so they could be removed for transportation or storage. The nacelles, themselves, were made from 18” diameter steel casings made for oil wells, with square steel tubing providing internal strength for the pylons, wings, and connectors that plugged into the hull.
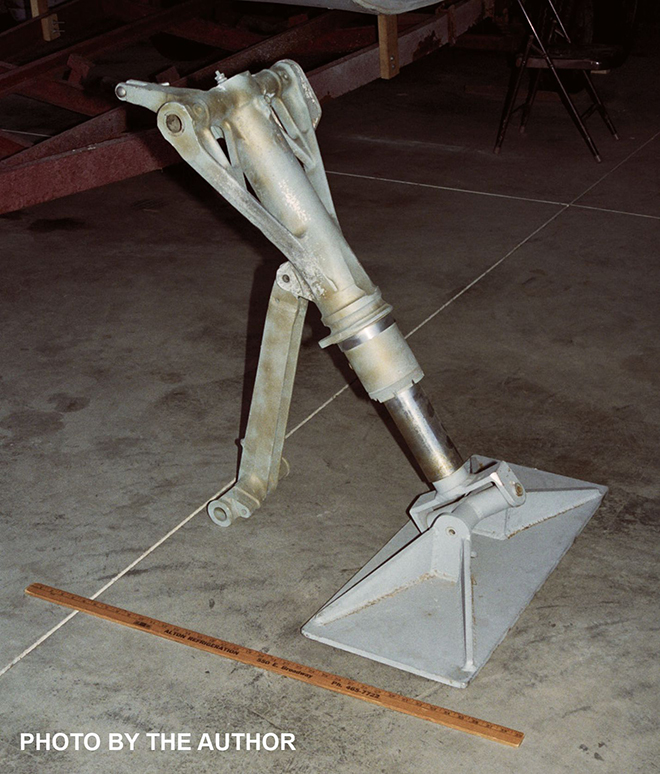
The aft landing strut was salvaged from the landing gear of a scrapped aircraft. The identity of this aircraft has remained a mystery for years. We have the serial number that’s stamped on the landing gear, but this is of limited help since most of the aircraft companies’ old records have been disposed of. The leading contender for the mystery aircraft thus far is the F-106 Delta Dart.
Details, Details…
The intended purpose of a pair of 5.75” by 13”openings, located at the shuttlecraft’s bow, just under the chine, has been a mystery for years. They’ve usually been portrayed as vents in toys and in blueprints drawn by fans, but in every hi-res photo from the 1960s that I examined, they appeared to be nothing more than open holes in the bow. While I was designing Polar Lights’ Galileo kit in 2013, I decided to get the answer straight from the horse’s mouth, so I telephoned Gene Winfield at his shop in Mojave, in the desert north of Los Angeles. Gene explained that the openings were intended for the shuttlecraft’s landing lights, and that the openings would be covered by a pane of glass to make the lights more aerodynamic. He further explained that he had wired the nacelle domes for lighting. The actual lighting would have been installed by union workers at the studio, per the agreement regarding outside vendors, but it appears that budgetary concerns nixed that plan.
Similarly, the impulse deck consisted of a pair of Plexiglas grilles, with the mock-up’s interior being visible through the vents in the grille. During filming, one or more sheets of white material was propped up inside the mock-up to block the view.
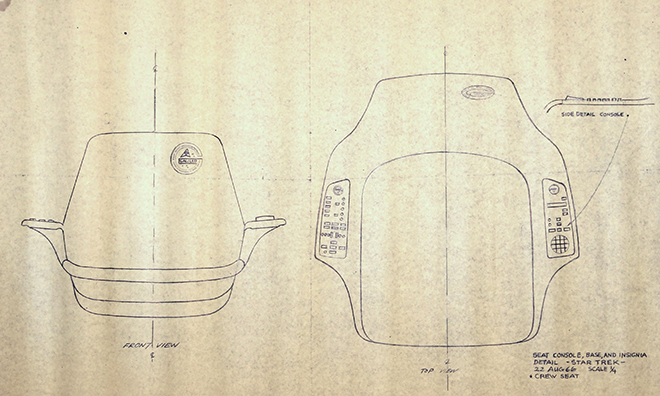
Over a series of phone calls and emails, Mr Winfield explained that most of his papers were still boxed up, following the move to his current location in Mojave. He still had the molds for the Galileo’s fiberglass chairs somewhere, but wasn’t sure where they were stored. He did say that he had a couple old rolls of blueprints laying around, and asked if I’d like to see them. Of course, I said “YES”, and within a week or two, they arrived at my house.
The original plans were extremely yellowed and fragile, and they showed something unexpected: details that Matt Jefferies had designed for the interior set, but which, like the exterior lighting, had never been installed. Included were instrument panels for the swing arms of the two globe-shaped viewers, a Galileo logo for the chairs, and instrument panels for the arms of the chairs (presumably the pilot’s and co-pilot’s).
Next time Gary explores the interior set.
All images courtesy of CBS, except where noted.
TM & (C) 2020 CBS Studios Inc. ARR.
STAR TREK Modeling: A Brief History of the Shuttlecraft Galileo Pt. 1
As the lead developer for our line of sci-fi kits, I can’t be an expert in everything so it is good to know people that “knows people.” One of Round 2’s “go-to” consultants is STAR TREK expert Gary Kerr. If he doesn’t have the answer to any given question he knows who does. He has a lifetime of “side adventures” that have given him close contact with many of the Star Trek filming models and in some cases, our kits are based solely on his exhaustively documented plans of some of the ships he has encountered. Most recently, his plans were used to develop our 1:32 scale Galileo Shuttle model kit. Along the way, he was given the opportunity to write up an article about the Galileo for STAR TREK Magazine published by Titan Publishing. As he wrote, he found that his information overflowed his allotted word count. Neither of us wanted that effort to go to waste so we invited him to publish the overflow on our blog. We’ve chosen to break it up into a series that will be rolled out over the coming weeks. So without further ado. Here is part 1…
A Brief History of the Shuttlecraft Galileo Pt. 1 By Gary Kerr
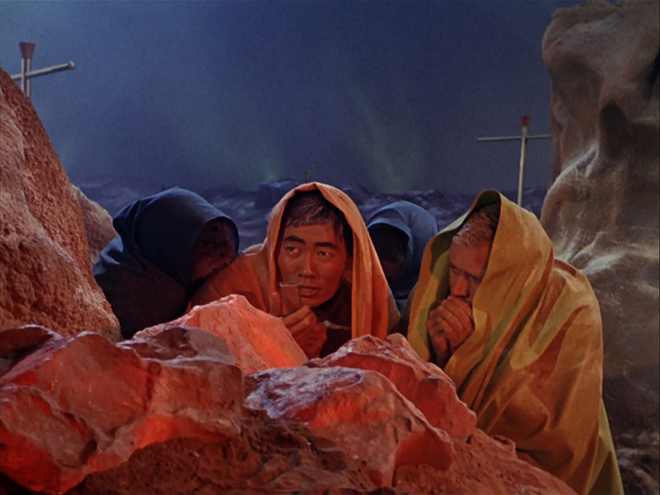
Poor Lieutenant Sulu… slowly freezing to death after a malfunctioning transporter strands him and the rest of the landing party on the increasingly frigid planet Alpha 177. The glitchy transporter beams down heaters, but they are non-functional, and the landing party seems doomed unless Scotty can repair the transporter in time.
Modern viewers of “The Enemy Within” might be forgiven for wondering why the ship simply didn’t send down a shuttlecraft to pick up the landing party. The truth is that even though the Starship Enterprise sported a pair of clamshell hangar bay doors at the end of its engineering hull, it didn’t yet have any shuttlecraft or a hangar to house them in.
This article will examine the history of both the “full-size” Galileo mock-up and the filming miniature. To begin, we should backtrack and examine the origins of Star Trek’s first shuttlecraft.
In the Beginning
As the final design of the Starship Enterprise began to gel in 1964, it became apparent that a starship would probably carry an assortment of smaller craft. Art Director Matt Jefferies added a hangar bay and a pair of clamshell doors to aft end of the ship, but deciding what kind of craft would be housed in the hangar bay was not an easy matter.
One of Jefferies’ initial concepts called for a small, aerodynamic pod that would be light enough to be lowered from the studio ceiling on wires to simulate a landing. This ambitious concept was abandoned as being too costly. Desilu continued to give the construction of shuttlecraft a thumbs-down, which is one of the reasons for Lt Sulu’s predicament in “The Enemy Within.”
All seemed lost regarding the shuttlecraft situation until August 1, 1966, when Associate Producer Bob Justman informed Gene Roddenberry that Desilu attorney Ed Perlstein had concluded a mutually beneficial deal with the AMT Corporation.
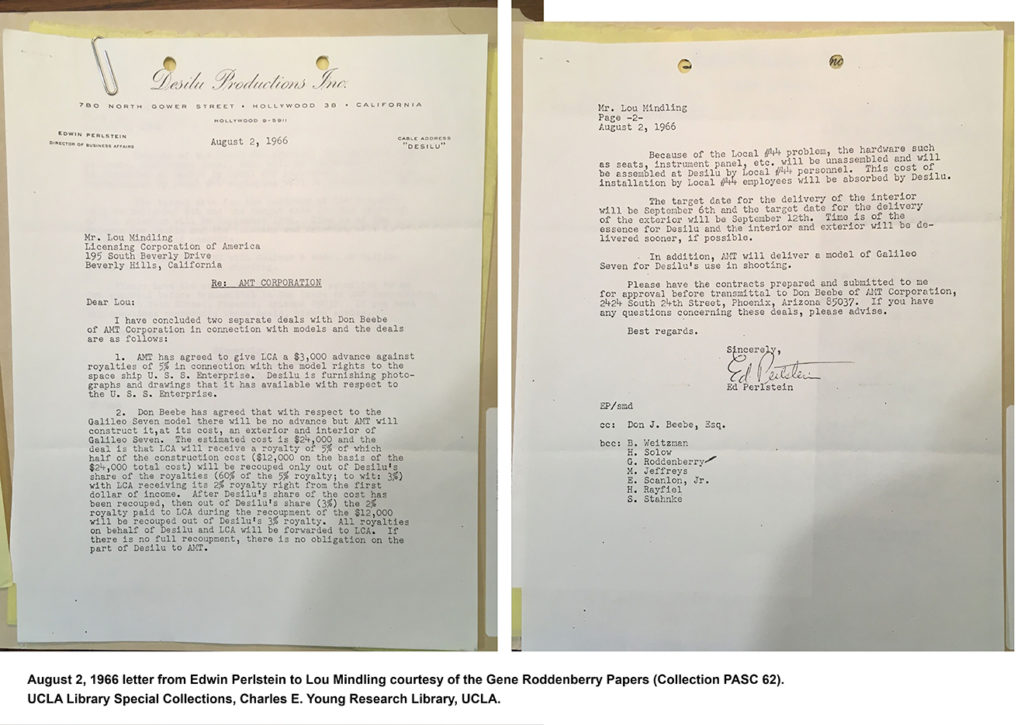
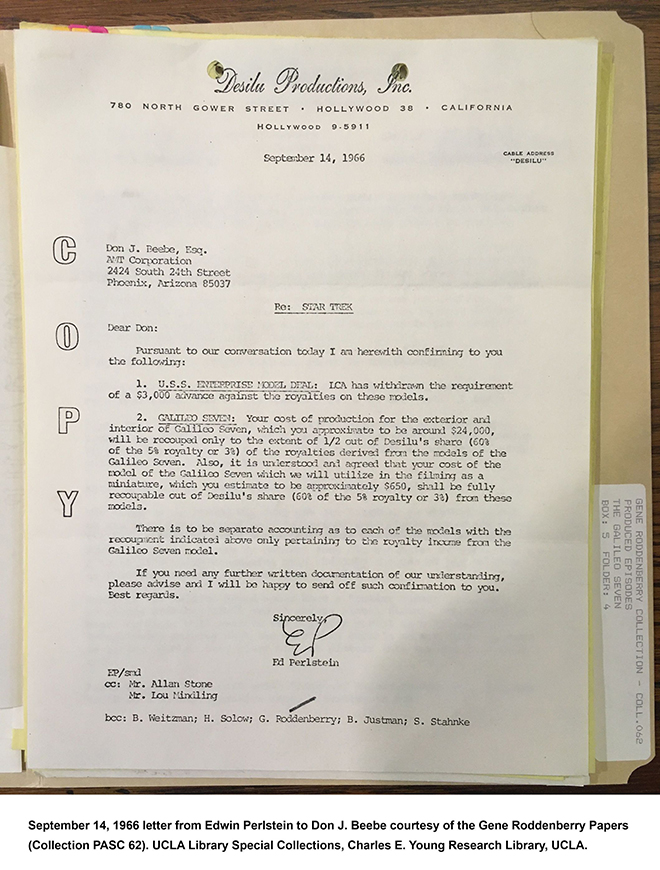
In exchange for rights to produce a plastic kit of the USS Enterprise, AMT agreed to construct both an interior set and exterior mock-up of a shuttlecraft for an estimated $24,000, plus an additional $650 to build a miniature shuttle. The work would be done at AMT’s Speed and Custom Division Shop, in Phoenix, Arizona. Gene Winfield, who was serving as a consultant style designer for AMT’s auto kits, served as production manager.
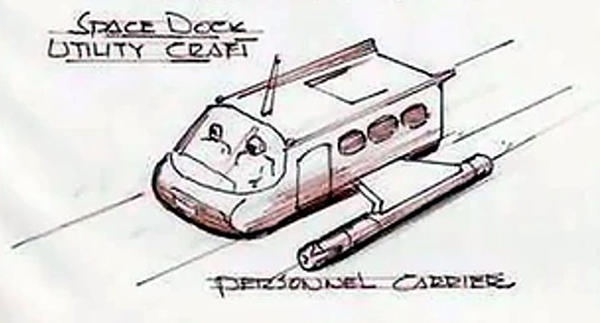
At this point, nailing down the design of the shuttlecraft moved into high gear. Although Matt Jefferies favored a rounded, aerodynamic design for the shuttlecraft, he became the first, but not the last, Star Trek art director to learn that compound curves were a no-no on a television budget and time schedule, and that a shuttlecraft had to be built from sheets or plywood and Masonite. Winfield and Jefferies set about designing a flat-sided shuttle that could be built in the allotted 30 days. The inspiration for the preliminary design seems to have been Jefferies’ 1964 sketch of “Space Dock Utility Craft Personnel Carrier”.
Jefferies and Winfield passed a preliminary design to Thomas Kellogg for further development. Kellogg was an industrial designer, working at the Raymond Loewy Associates design studio in San Francisco. Kellogg worked in some design elements of the studio’s renowned design of the 1963 Studebaker “Avanti” car and created a color rendering of the revamped shuttlecraft.
Jefferies added a pair of warp nacelles to Kellogg’s design, and Winfield’s shop was ready to begin construction of a 22’ prop and a 22” miniature shuttle. Union Local 44 is a professional association of craft persons having specialized skills and talents at Paramount, and the studio’s practice of having outside, probably non-union, vendors supplying props for a TV production would almost certainly cause friction with the union. To avoid problems arising from the studio’s use of outside vendors, the studio and the union arrived at an agreement under which vendors would supply props in an unfinished state, and union craft people would perform the final painting, detailing, and installation of lighting.
Even though the filming miniature and the full-size prop were supposed to represent the same ship, they are not identical. The most obvious difference involves the shape of the hull, with the sides of the 22” miniature being parallel, while the aft end of the 22 ft prop (including the nacelles) flares out slightly wider in back.
Why the difference? To find the answer, we need to jump to the spring of 1992, when I met with Lynne Miller, the owner at the time of the large Galileo prop. The Galileo was located at the Akron-Canton Airport in Ohio, and I spent several hours documenting the shuttle, which was slowly undergoing a restoration.
Lynne revealed that Matt Jefferies had told her that the Galileo was only three-quarter scale. This made perfect sense after I’d climbed inside the shuttle. Being inside the mock-up was akin to crouching inside a very wide minivan. It was certainly a far cry from what we saw on TV! Making “full-size” props at somewhat less than full scale is a common practice in Hollywood. I didn’t realize it at the time, but Matt Jefferies’ brother, John, wrote in his biography of Matt, Beyond the Clouds, that Matt often utilized “illusionary perspective” to create the illusion of distance and makes things appear larger than they actually were. Looking back and seeing that many scenes involving the Galileo were shot at the rear of the prop, I am now convinced that when Jefferies made the rear portion of the 22-footer flare out wider, he was using illusionary perspective to make the three-quarter sized shuttlecraft appear larger.
The use of an undersized prop makes perfect sense: construction costs were less, the prop could be moved more easily around the soundstage, and it took up less precious storage space.
Come back next time as Gary dives into the construction of the miniature and the set pieces.
All images courtesy of CBS, except where noted.
TM & (C) 2020 CBS Studios Inc. ARR.
AMT Model Kits: James Bond Moonraker part 2
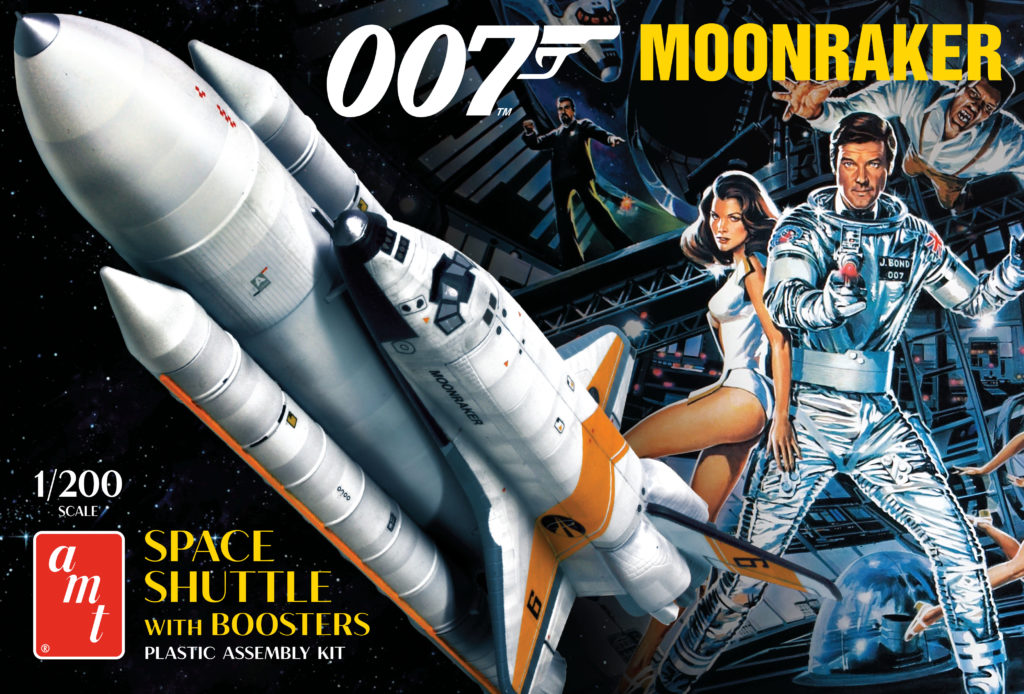
JAMES BOND 007: MOONRAKER SHUTTLE READY FOR LAUNCH!
Are you in need of thrillers, spills and something OUT OF THIS WORLD? AMT will transport you to another world the James Bond 007: Moonraker Space Shuttle!
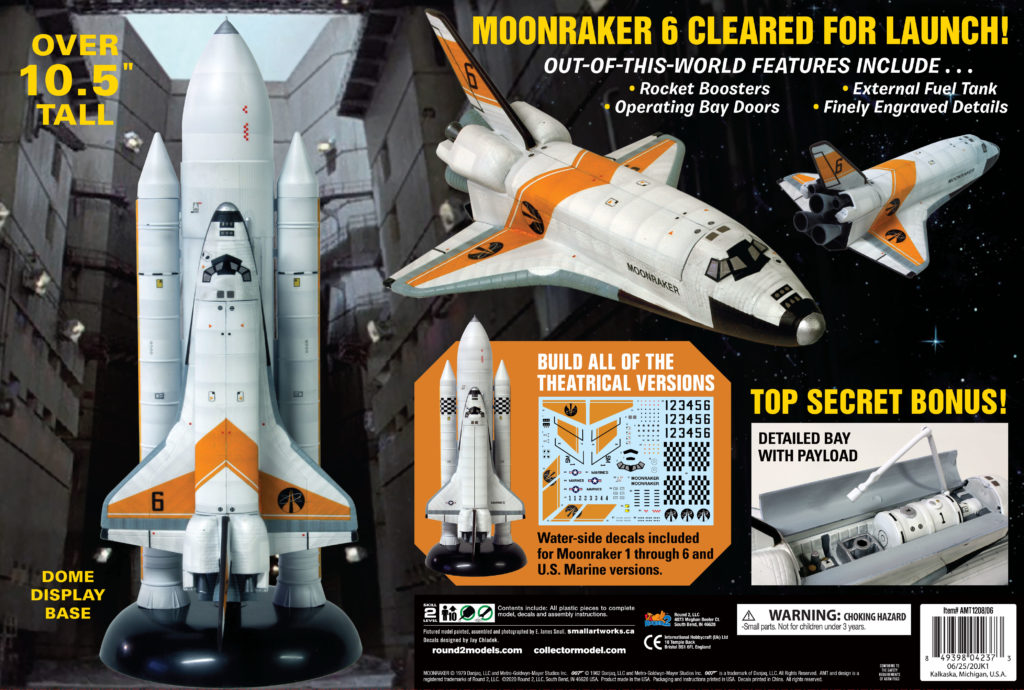
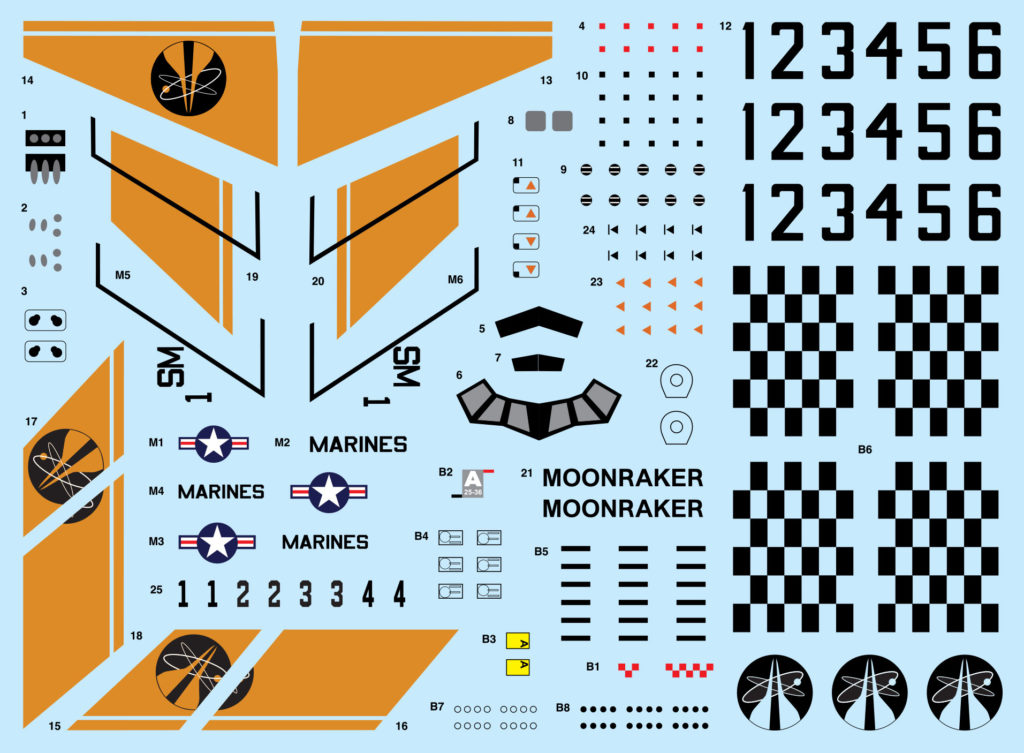
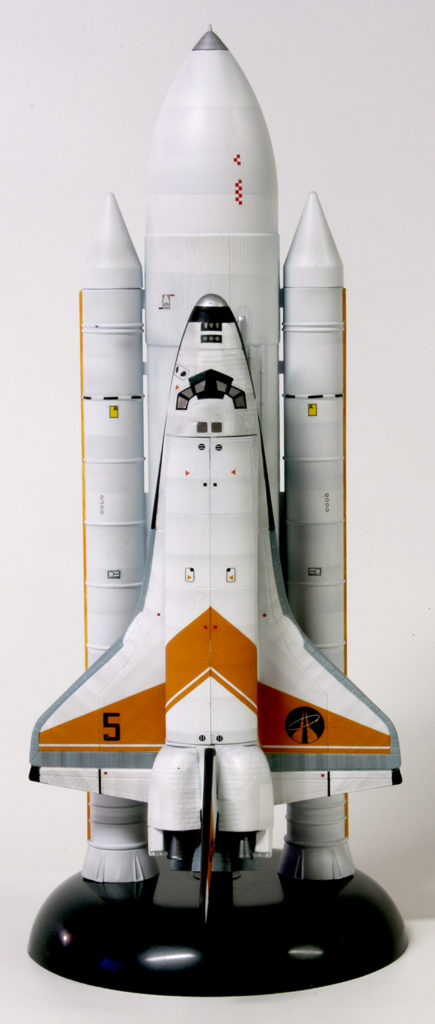
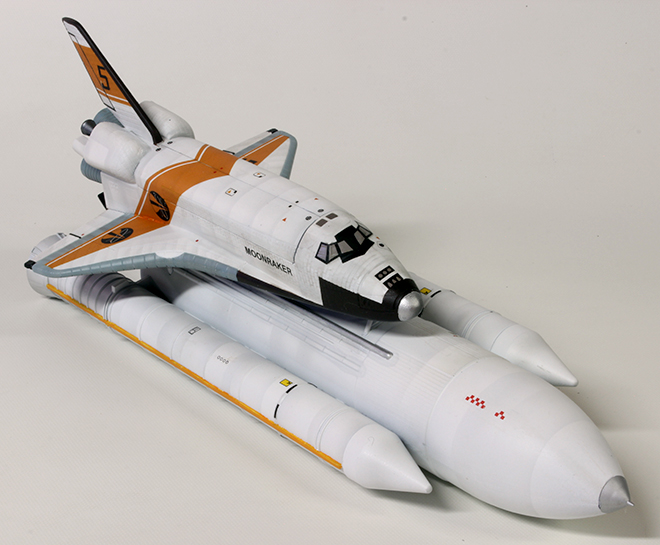
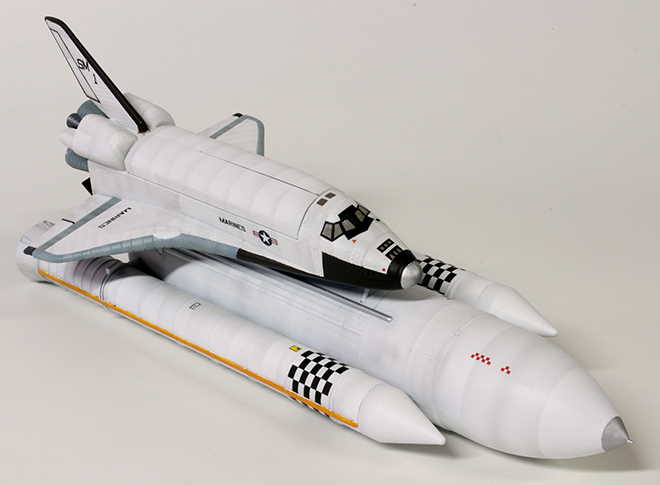
The 1:200 scale space shuttle kit includes rocket boosters, fuel tank, operating bay doors, a top secret payload and a dome display base. When assembled the model stands at over 10.5″ long. The kit also includes colorful packaging, assembly instructions and full color decals to do Moonraker 1 thru 6 or the U.S Marine version featured in the classic 1979 sci-fi spy film. Packaging lid shown above. Tray and decals are below.
AMT Model Kits: James Bond Moonraker
Here is a special guest blog from Jim Small. Apologies to Jim. He had written this to be included on our instruction sheet, but a few matters shifted during the time when we started working from home as a result of the Covid-19 crisis and we lost track of this. So we gladly present it here.
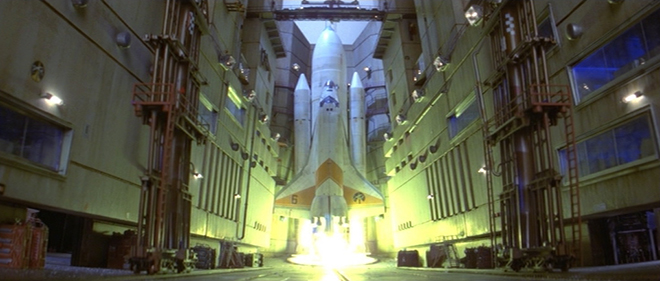
The ending of the 1976 film “The Spy Who Loved Me” credits crawl stated that Bond would be back in “For Your Eyes Only”. However, with the surprise success of Star wars in 1977, that would all change. It was suddenly time to put Bond in space, and Moonraker began production, pushing FYEO on the back burner. The late great British visual effects legend Derek Meddings, who was quite at home with many previous (and subsequent) Bond films, was again hired to produce the many shots needed to achieve the first footage of what a real space shuttle launch into space might look like several years before NASA launched theirs, albeit with a lot of artistic license.
Along with a plethora of other miniatures, several models of the shuttles were built at various scales, 1/24th for the largest orbiter measuring a little over 60 inches long and 1/48th scale with the stack measuring 46 inches high for the liftoff sequences, the orbiter measuring 30 inches long for other miscellaneous shots. Other smaller ones for distance shots and seen attached to the massive space station were built too, possibly made from existing commercial kits. Drax’s Moonraker shuttles numbering 1-6, painted with orange stripes and the U.S. Marines version with the “star and bars” emblazoned on the fuselage and wings were the two liveries seen.

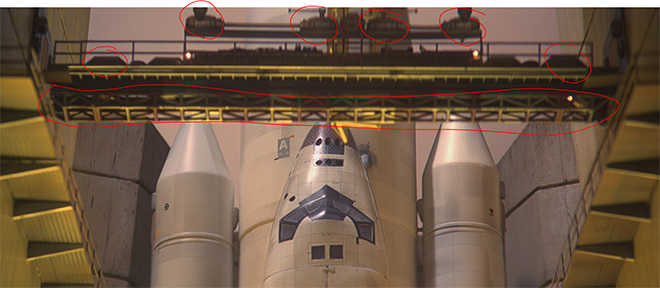
As there were several models made of each ship, all of them looked slightly different with various “technical markings” and other details that were often rather inconsistent. Therefore it’s up to the builder of this kit to decide where those smaller markings on the decal sheet that are not numbered can go. Suggestions are provided on the box art photos. Because the budget of the film did not allow for the expensive and complex new motion control & blue screen work employed in Star Wars, more traditional methods of simple “in-camera” multiple exposures were used to assemble shots with the models filmed against a black background, hard mounted on stands or suspended on wires. Consequently, unlike the real shuttles that were overall white with a black belly, the black was substituted (except for around the cockpit windows and other smaller details) for a dark reddish brown on the miniatures to help them stand out against the black background they were filmed against.
As a fun little bit of trivia, sharp eyed modeling fans will notice bits and pieces of the old MPC Space: 1999 “Eagle” kit placed throughout the Moonraker launch bay shown in the film!
Now here is a closer look at the buildups featured on our packaging. Both Moonraker and marine decals are included in the kit.
Polar Lights Model Kits: Discovery Enterprise decal numbering correction
How are you doing in this “new normal” hopefully you’ve been able to spend some time modeling as businesses reopen and we baby step our way through this ongoing crisis. Here at Round 2, our full staff has returned to the office after many weeks of working remotely from home. It seems like we haven’t skipped a beat. Well, maybe one beat was missed…
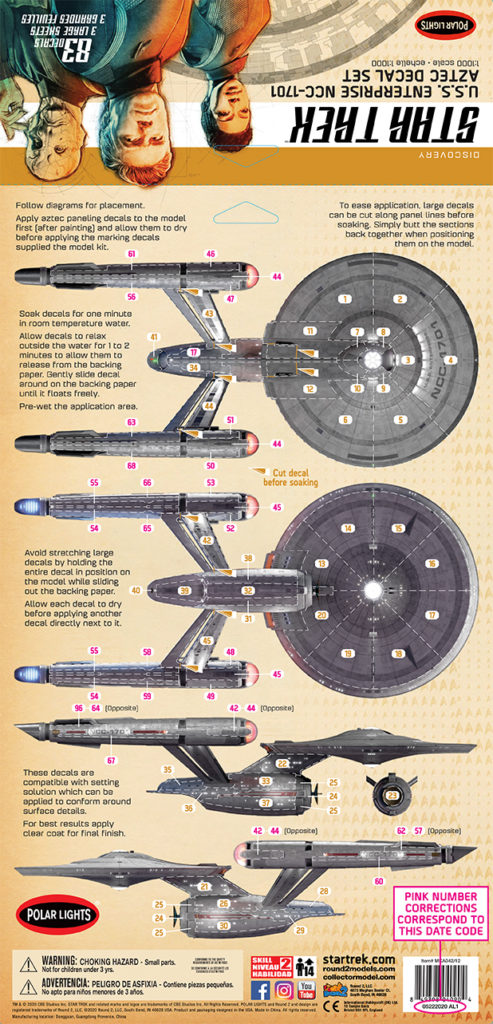
Because we have been working remotely, we couldn’t follow our usual methods of proofing and double checking and some errors were made in the numbering of our upcoming STAR TREK DISCOVERY U.S.S. Enterprise Aztec Decal Set. Some of you may know that the product was delayed slightly and missed being delivered with the kits and light sets. The numbering error was not the reason, but the delay in release did play a roll in the error. We will be sure all future production orders will be corrected. Without further ado, you can see the corrected numbers in this image and high res PDF can be downloaded here.
Everyone just stay calm… and build a model…

The world is a crazy place these days, but if you have to stay home… why not dig out that kit you’ve been meaning to get to…? Jump over to our Facebook page and show us what’s on your bench right now.
Round 2 wishes the best for modelers everywhere in the unprecedented situation we find ourselves in. Take care everyone!
Round 2 Models: Live 2020 model kit preview

SPECIAL ANNOUNCMENT: This Friday (1/31/2020) tune in for a LIVE look at some of the NEW models you can expect from AMT, MPC and Polar Lights in 2020!
Model kit developer, Jamie Hood, will be showing both new sci-fi AND CAR KITS! He will have a couple guests along for the ride. Watch live on our Youtube channel and ask questions via the live chat. here is a link to the show…