Recommended Sites


Archive for the ‘Round2 Models’ Category
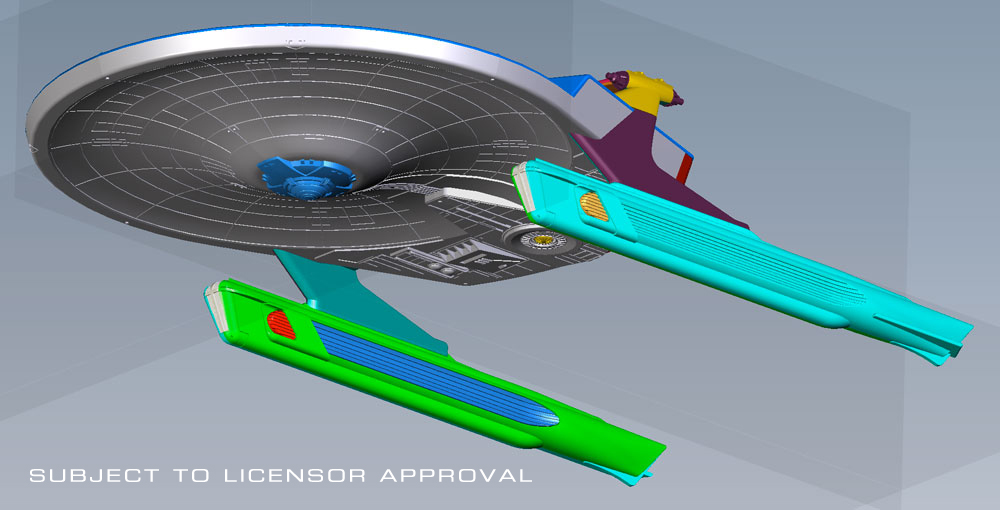
Star Trek Model Kits: U.S.S. Reliant preview
We had announced at Wonderfest that we’ll be releasing a 1:1000 scale kit of the U.S.S. Reliant in 2014. It is personally one of my favorite Star Trek ships. We’ve been working on it for a while now.
Angelo Bastianelli who worked on our recent Cadet Series models built the CG model. At this stage, there are still a few details for the factory to nail down, and then we’ll be able to see a prototype (hopefully soon).
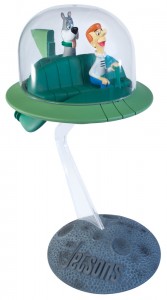
Meet George Jetson…
In 1962 the world was introduced to the future as The Jetsons made their television debut. Set in 2062, the show followed the day-to-day exploits of family man, George Jetson. This re-issue of the Jetsons Spacecraft model kit is a simple to assemble snap-together model. It comes injected in green and clear plastic and includes prepainted figures of George and his loyal dog, Astro. Both figures have been re-sculpted to capture authentic likenesses of the characters.
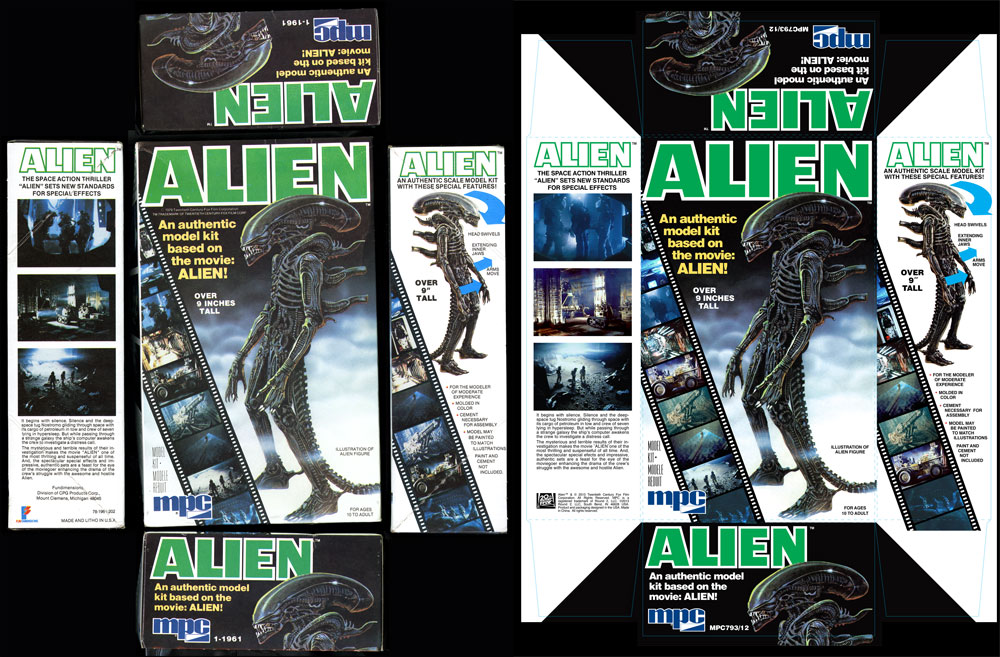
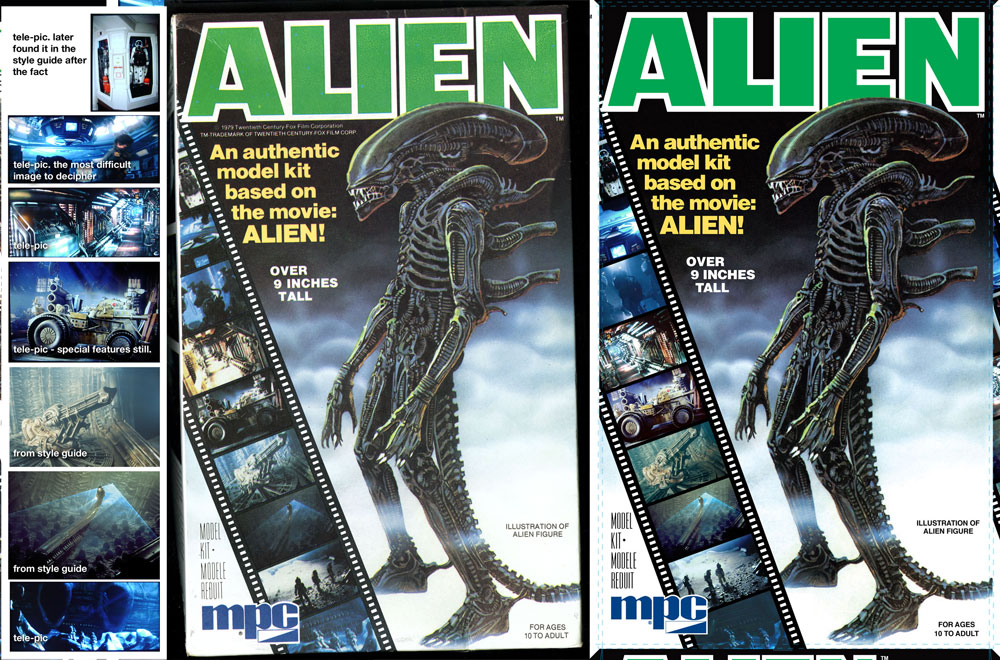
Round 2 Model kits: Recreating the MPC Alien Box Art
In the process or recreating the original MPC Alien box art, I had quite a time finding all of the images that were used originally. Modeler and historian, Mat Irvine, recently inquired about what the differences were. It was a fascinating hunt, so I figured I would reorganize my explanation and share it with you guys.
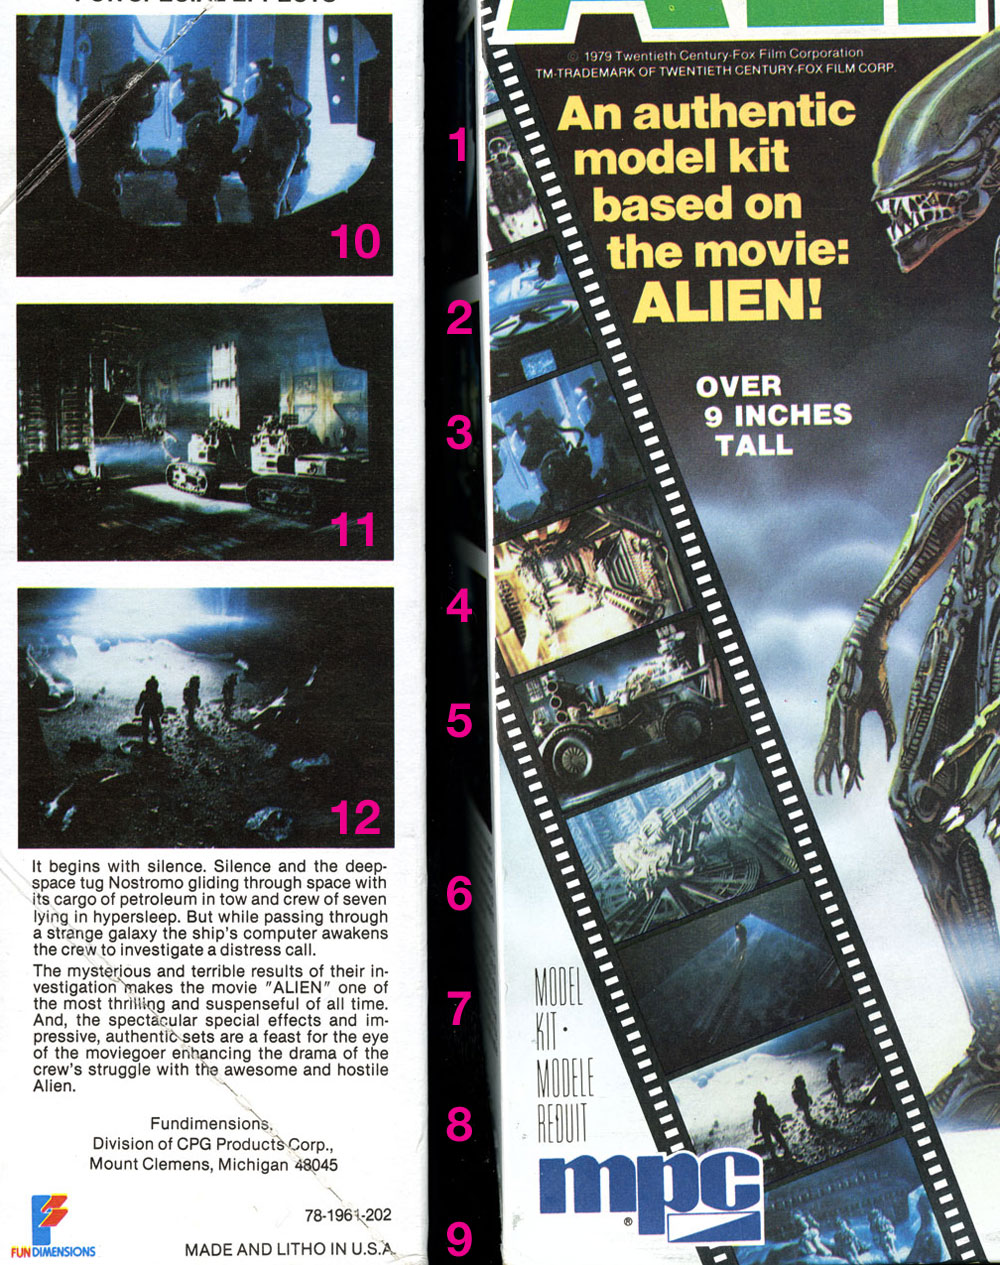
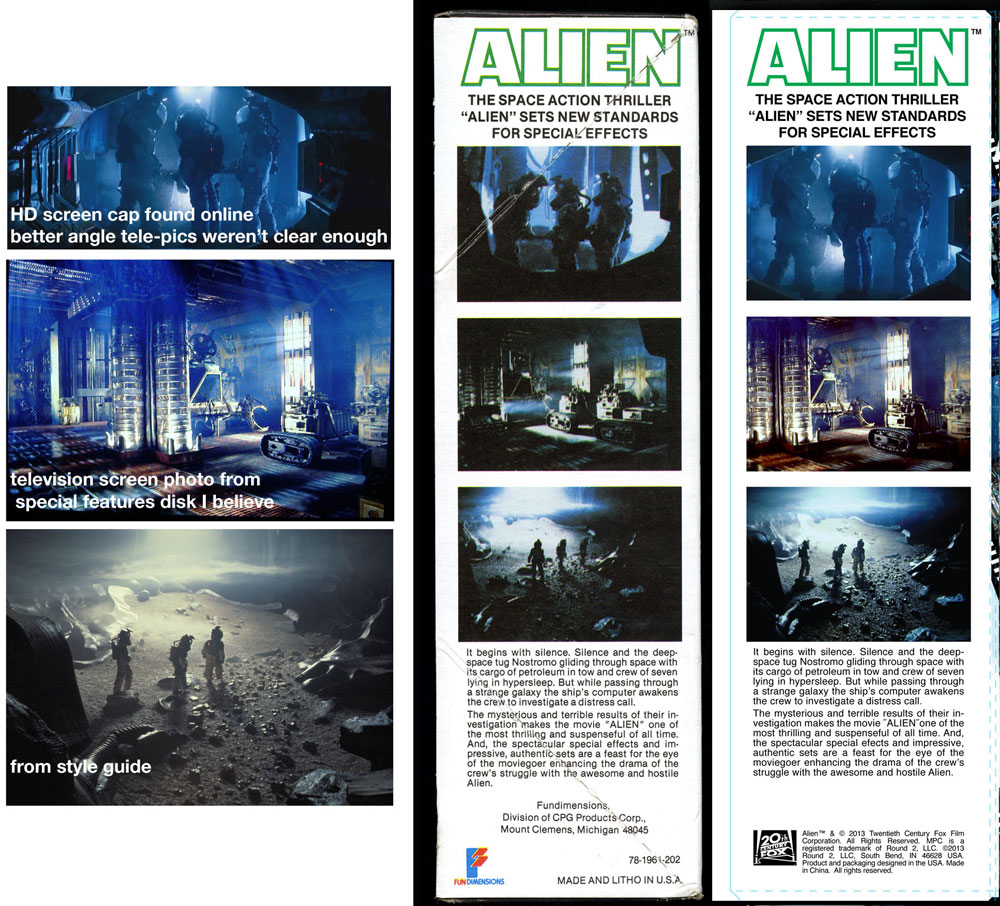
First, I’m showing the before and after images. The left side shows the original raw package scans of our vintage kit. The right shows our final production art. Whenever we reproduce a package we take a little bit of liberty to punch up the color slightly to account for fading. We replace any solid color with our best guess of the original CMYK values. In this case, the green in the word “ALIEN” was 100% cyan and %100 yellow. The scanner always captures values of magenta and black that was never on the original piece. Otherwise, we force black to become black, white to become white, etc. and generally touch up the image as needed to remove printing flaws or dirt.
The challenge of this particular piece was the small inset images in the filmstrip on the front and side of the box. I knew that many of the images were familiar and figured I could find them either in the licensor’s style guide assets or could be found online. Since they were relatively small, even medium-res images would work well enough. I decided to hunt them all down rather than spend time doctoring up the small shots that when looked at closely really broke up due to the larger dot size that was used during printing back in the day. Upon close review, the images were rather muddy.
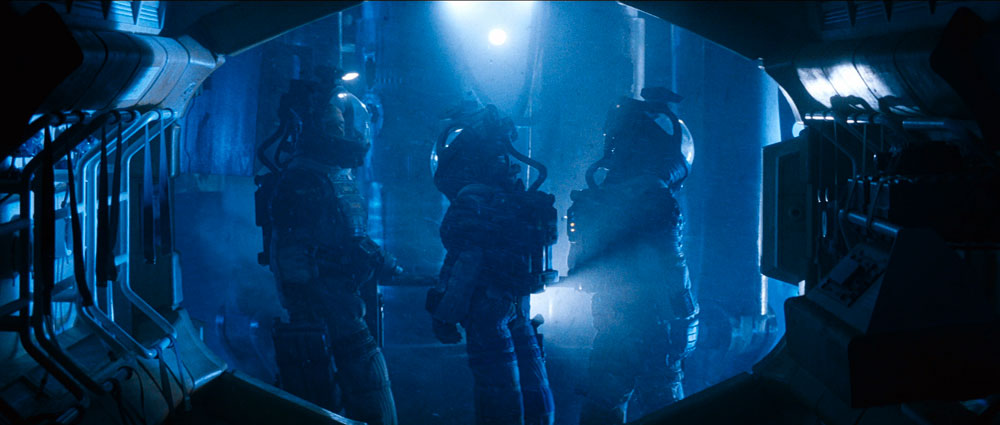
We’ve all seen the image of Kane walking the transom in the egg room and the shot of the Space Jockey. Images of the Nostromo corridor and pics of the trio in their EVA suits seemed familiar enough and seemingly didn’t pose a problem. I knew some shots were more obscure like those of the tractor on the front and the Nostromo storage bay on the side. I figured the rest would be discovered along the way with some deep digging. Little did I know what I was getting into. I’ll cover each one shot by shot starting with the easy ones…
#6 & 7 were the most straight forward as I found nice hi res pics in the style guide. And that’s where the “ease’ of the project would end.
#8 & 9 and maybe #10 seemed pretty familiar. I had to have seen them somewhere or another. As it turns out, “close” images could be found of #8 in the style guide. The positions of the figures weren’t quite a match, but upon reviewing the film, we never saw them in the film in that exact position either, because I watched it again… to find that shot and all of the others I was lacking. I defaulted to an HD screen grab found online to supply pic #10. I settled on using the style guide image for #8. I found myself resorting to more drastic measures for #9 and several others.
#5 & 11 I had never noticed in the film before. After watching again, I found them, but at different angles than what we see on the box.
#2 reminded me of the emergency helmets on the bridge of the Nostromo, but I’ll be darned if I could tell you where those suits show up on screen.
#4 was kind of tricky but #2 took the cake. The pic of the corridor is mirrored form what we see on screen. I eventually realized this and found a scene that was pretty darn close, but what the heck do we see in pic #2? Eventually, I realized the only way to figure that one out was to keep an eye out for anything resembling a perspective shot of something resembling a wagon wheel. I eventually figured it out. The image is a rotated shot of the ceiling in the bridge. I tracked down that shot eventually.
So how did I get the images I was missing? For DVDs we have an app for that, but the images are really small. Bluray is the way to go, HD with nice brilliant color, but we didn’t have a Bluray drive and pulling screengrabs from a Bluray is a complicated process. (which we eventually figured out after the fact) So, I basically paused the Bluray on my HD TV at home and took a photo of the screen. I had the lights out and camera on a tripod for stability. After some experimenting, I found decent enough results that they tightened up well enough for the packaging. In some cases, I tweaked the color balance a bit to more closely match the box. In the case of the tractor in pic #5, I found that buried in the image gallery (that I otherwise never would have gone through) on the special features disk. I found the suit in #1 there as well. I had a bit of egg on my face though when I later also found the suit pic in the style guide assets.
In some cases, there was no exact match and I settled for the best I could get. My theory is that since still photography from a handheld camera would have required a flash that we would have seen on screen. Therefore, my final hypothesis is that the shots on the box that don’t quite match were from cut footage of some kind. In the case of image #10, the characters are riding the elevator down, but in the film Kane is facing the opposite direction before the scene is cut. He never faces right with the elevator that low.
So there you go a great adventure in packaging design. Only the crazy few would dare go down this path. But, what the heck it was fun. In what other business do you have an excuse to watch a great sci-fi movie like ALIEN to make your paycheck?
Berrien County Youth Fair Auto World Trophy Winners
Congratulations to all of the winners from the Berrien County but particularly the 3 that have won the Auto World Trophy for Modeling and Pine Wood Derby
Folk Arts – Woodworking – Ch. Pinewood Derby Cars, 5-8 AutoWorld Store Trophy
A – Andrew M Smith, Saint Joseph, MI
Folk Arts – Woodworking – Ch. Pinewood Derby Cars, 9-15 AutoWorld Store Trophy
A – Robert L Cromwell, Berrien Springs, MI
Folk Arts – Crafts – Champion Models AutoWorld Store Trophy
A – Collin C Krumrie, Bridgman, MI
This is a highly anticipated re-release of a kit that fans have been hoping AMT would reproduce for many years now. The kit parts have been molded in a clear metallic purple color, tires in a black vinyl and the windshield in clear or optional blue. The wheels, engine, roll bars and bright work are all chrome plated. The large decal sheet includes flames, stripes and various custom graphics that allow the builder to put their own spin on the project. The shortened VW chassis is well detailed, as is the fully chromed engine, complete with “bag of snakes” exhaust pipes. For this special release, AMT has also included a multi piece die cut cardboard display of a typical California beach drive in from the 1960s – the same type that AMT included in this kit when it was originally released.
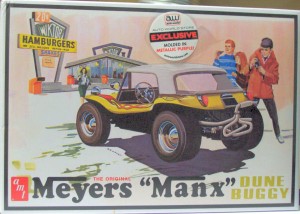
This is a great kit, with lots of potential. The modeler can build 3 different off road versions as well as a street version of the Manx. Options include 2 up tops – a hard Surrey style flat top or a more conventional shaped top; build it open with simulated tonneau cover over the back seats, as well as a body-less full blown race style dune buggy with roll bars.
Thanks for the great review Cyber Modeler!
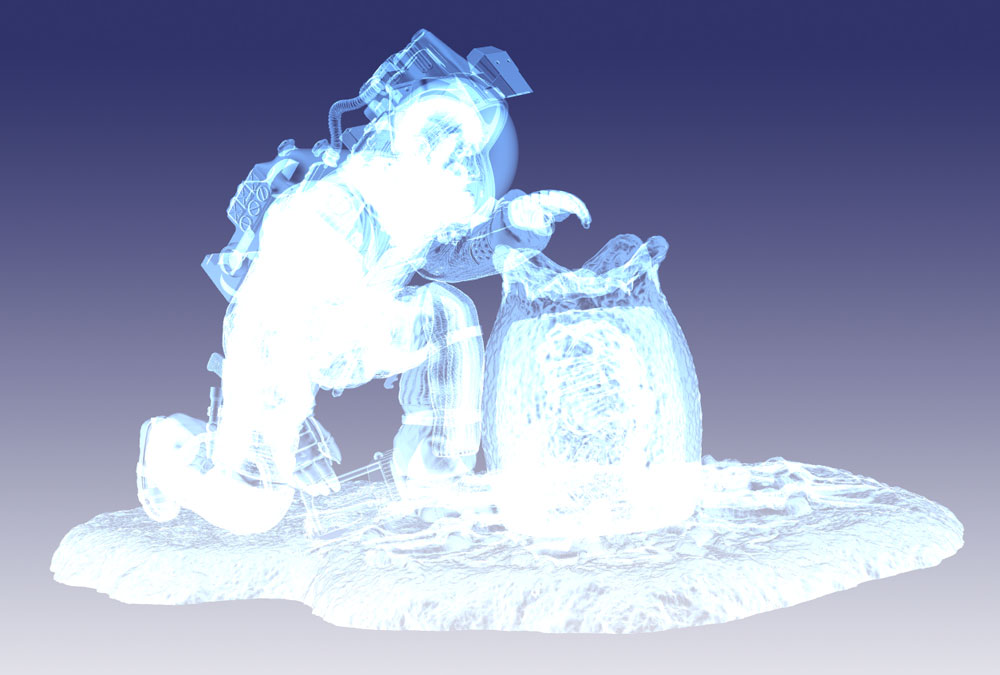
Polar Lights ALIEN: EO Kane teaser
I just realized it has been a bit since we last posted something. I was reviewing our digital sculpt of our recently announced ALIEN Executive Officer Kane kit. I’m all for the dramatic so I figured I would throw up this quick teaser image. The sculpt was done by zBrush master (and one of our annual Wonderfest neighbors) Bill Wieger.
The kit will be 1:9 scale to match the scale of the MPC ALIEN kit. We are still getting pricing settled and we are deciding whether to do it in resin or as a vinyl kit. Injected styrene would be problematic for this one because of all of the detail that tool trapping would cause. Anyway, see what you can see. We’ll be showing off the whole thing soon.
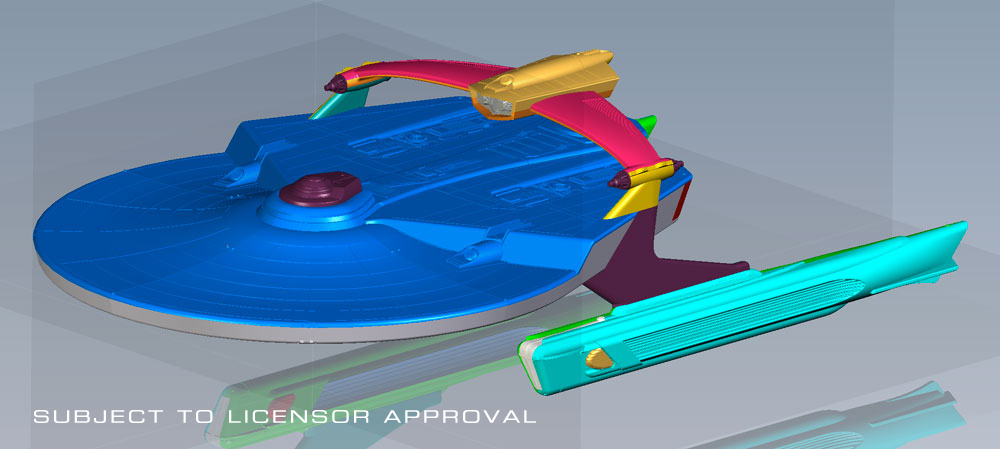
PolarLights 1/350 Refit Enterprise

We recently received this buildup from an excited customer. Taking nearly 17 months to complete, the refit kit is a replica of the Star Trek: The motion Picture .
Visit http://scifimodelaction.com/sfmaforum/index.php?topic=1421.0 to see the full build-up
The 4-H model – Finishing
Ensure that all paint and glue on your model is perfectly dry. It is good practice to start applying decals the day after you finish assembly and painting. Ensure also that your model is free of contaminants and dust, so nothing may be trapped underneath a decal.
Cut out all the decals you wish to apply with a sharp knife. It is not necessary to cut out the decals perfectly; rather you should leave a few millimeters around each decal to avoid cutting it accidentally.
Fill a bowl or shallow cup with warm water. The water should be at least lukewarm to remove the decals from the paper they are printed on, but not scalding hot. Never use boiling water to apply decals.
Hold the paper the decals are printed on with a pair of tweezers. Make sure you are not gripping a part of the decal itself under the tweezers.
We actually held the paper next to the car and gently slid the graphic onto the car. It is helpful if you get the car wet prior to sliding the graphic to help in positioning it. This will allow you a few seconds to slide the image into the place you want it.
Hold the paper the decal is printed on close to the part you are applying the decal to. The edge of the paper must be lying on the edge of the part, so the decal is transferred immediately from paper to part. Using a clean, wet brush, maneuver the decal onto the part and position it accordingly. Ensure that all air bubbles and creases are removed from the decal by pushing them out with the brush.
Dry the decal by very gently by dabbing it with a clean paper towel. The decal should be left alone for an hour to allow it to dry completely. Until then, it may be accidentally repositioned. To reposition a partially dry decal, simply apply some warm water with the brush and maneuver it back into position.
A few things we have learned…
- Remember that whatever paint-removing solvent you use, it must not harm plastic.
We do have a minor issue under the car where the solvent degraded the plastic a little,but it is underneath…
- Keep all empty sprues when you have finished assembly. They are useful for stirring paint, or making tools that won’t scratch the model you are working on.
These are also helpful for applying glue and you can throw them away when done.
- Keep all unused decals. You may later find them useful for other models.
- Some parts are more easily painted while left on the sprue.This is true particularly of very small parts for the engine. He chose to leave some the original color and chrome but that is an artistic choice.
- A torn decal is not useless. Careful positioning of the damaged portions can restore the decal to a whole appearance.This is where wetting the model can be handy and allow you to slide the decal into position.
- If your paint is too thick to feed through the airbrush, try diluting it with a small amount of rubbing alcohol. The alcohol thins the paint while it is in the airbrush, but evaporates soon after leaving it.
- When applying solvents, paints and glues, do so in a well-ventilated area. Observe all warnings and instructions printed on all your materials and tools.
- Knives and other sharp tools must be handled by experienced and responsible persons only.
- Small parts may pose a choking hazard to small children and animals.
The 4-H Car ….Assembly
- Before gluing parts together, always ensure that the contact points are clean and that the parts fit well. When applying the plastic cement, only apply to one of the parts. An excessive amount of plastic cement will not only prolong or prevent proper adhesion, but may also melt and deform the parts. Plastic cement must always be used as conservatively as possible. When gluing clear parts, such as windows or canopies, try to avoid plastic cement. This is because plastic cement can “fog” clear plastic even in areas where not directly applied. For clear parts, use white glue.
- Gaps between parts may become apparent after assembly. To remove a gap that is too large to overlook, it may become necessary to separate the parts, adjust their fit, and re-adhere. Another option is to fill the gap with modeling putty, or another substance which dries to hardness and can be smoothed and painted over. When applying putty, only the smallest amount is required. An excessive amount will be difficult to remove later and in the case of clear parts, may be impossible to remove without evident damage to the part beneath. Follow the instructions on the packaging and use a plastic tool to apply the putty, so as not to scratch the model.
- If an assembled part is not adhering properly in some places, it may not be necessary to separate the parts and re-adhere. Another option is to use a liquid plastic cement to re-adhere the parts. By applying a small amount of liquid glue to the outside of the gap, the glue is drawn into the gap by capillary action. It is important not to apply too much glue, for the reasons above, but also because too much glue may remain outside the gap and dry to hard, malformed bubbles. In general, less than a drop will suffice. When the glue has been applied, hold the parts firmly together until proper adhesion is assured.
Once two parts are glued together, it may be necessary to clamp them together until the glue sets. This may be done by holding the two parts firmly together with your hands, but you may also use a variety of tools to do the same job. Elastic bands, clothespins, plastic clamps, tape, and wire are all suitable materials. When applying the clamps, make sure that the pressure exerted on the parts is great enough to keep the parts together, but not nearly enough to deform or break them. Also make sure that whatever clamp you choose to use will not scratch the plastic.
Whether you are a competitive modeler (contest, 4-H, Boy Scouts, etc…) or building for fun the following links offer some great tips and tricks to help you.
http://www.ndsu.edu/fileadmin/4h/FamilyConsumerScience/FE101.pdf
http://www.scaleautomag.com/
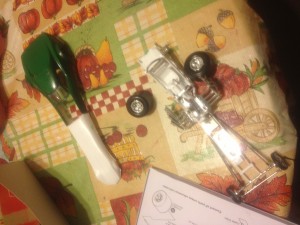
Here we are assembling the engine. He used most of the parts from the Stingaree model, he choose to use use the larger exhaust headers found in the Royal Rail model to customize this model. Here he is trying to hold them in place while they dry.
The 4-H car…Painting…
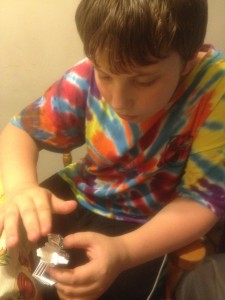
I am starting to learn what the H’s stand for…this is my son’s 4th year in 4-H modeling and each year become progressively more difficult. I have tried to help him find some of the best practices for completing these projects.
We live in an apartment for our first challenge was to choose a suitable place to paint. You should not paint where dust or other airborne particles may adhere to your work. Choose a clean, dry place, between 5 and 30 degrees Celsius to apply and dry paint.
We have a balcony which at least provided good ventilation, however he skipped the first instructions that were to wash the release agent and any other dust particles off the car and went right to work painting the car. (sigh). He also held the spray can about 3 inches from the car. Now I am not sure which of these factors caused the problem, but the paint pooled in spots on the car.
So, step 2 for my little modeler was sanding and stripping the paint off the car.
What he failed to realize is that Painting over particles will not remove or hide them, but trap them in place.
Now there are several kinds of paints you can use. We used model spray paint, some people prefer air-brushing. This is a little more costly (which is why we use the other)
You will want to mix your paint to a thorough consistency. Start by striking the closed container of paint sharply and repeatedly against the palm of your hand.
It may become necessary to mask adjacent parts from the part you wish to paint, so as not to accidentally get paint on that part.
When painting with a brush, always ensure that it is of appropriate size and that there are no loose or stray bristles. Brush painting should be reserved for small or isolated parts, or parts which require a certain finish to them. Applying paint with a brush leaves striations in the direction of brush travel, and must not be used for exteriors or large surfaces.