Recommended Sites


Archive for the ‘Round2 Models’ Category
Defying The Dark
Lighting a Mini “U.S.S. Defiant”
by E. James Small
Round 2 have begun doing a few things differently lately, and the difference is clear to see.
Let’s look at the newest re-release of the Star Trek Deep Space Nine kit. The entire model is now molded in clear plastic, allowing for the adventurous modeler to light up the whole thing more easily rather than having to bother with the tedious job of drilling hundreds of holes and installing fiddly fiber optics. The same thing was also recently done with the Star Trek Enterprise D kit.
For an example of how casting the kit in clear is advantageous, let’s show you how to shed some light into something that most people might consider impossible, the newly tooled and diminutive 3 inch “Defiant” model that comes with the DS9 kit. Remember you can light up the entire station using the methods shown here too.
Using five 3mm LED’s, the tiny ship can be fully lit with relative ease, and it’s easy to make a stand to both support the model “in flight” and serve as a power supply.
The photos here pretty much show it all. Note that, using files, you can even sculpt and sand down LED’s to fit your needs, such as in cramped areas. Just as long as you don’t sand through to the metal bits inside the solid epoxy case, you can modify LEDs to the shape and size you need and install them in areas where they would not normally fit. Plus, because LED’s stay cool, you don’t need to worry about them damaging the model.
First, the kit is test assembled and examined to see where you can install the LED’s. The Defiant’s engine and bussard scoops are glued in place, being careful to test to make sure the top of the body can be installed correctly afterwards.
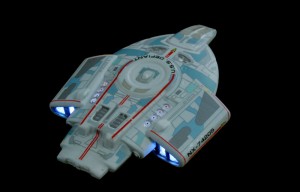
Next choose the LED’s to use for the model. I decided to use “warm white” 3mm LED’s for the bussard scoops and front sensor area, and regular (cool) white for the engines in the rear. Use whatever you think is best. Upon reflection I suppose I should have used a cool white or blue LED for the front sensor area since it is supposed to be blue, but it still worked out.
Hint: Stick with white, blue and green LED’s for most of your projects because they work rather happily on 3 volts, generated by two regular 1.5 volt dry cells connected in series. They can be tinted with transparent paints if you want different colours. The new pink and purple LED’s also work using 3 volts. But red, orange and yellow LED’s work at around 2 volts (one cell won’t light them up but two will burn them out!), necessitating the use of resistors which is more complex for the average modeler who may not be familiar with electronics. Please see my other article on lighting the K-7 space station here on the Round 2 Workbench for more details in using and soldering LED’s.
The most time consuming part is next… Practice installing each LED in place within the model, file down both the LED and the inside of the model as necessary until the LEDs fit in place and the hull fits together properly.
When you are satisfied with fit, choose some very thin insulated wire (such as telephone wire) and solder the LED’s together paying particular attention to polarity. You will need to plan it carefully and trim the LED’s leads accordingly.
Hint: Don’t solder the parts inside the model. Test fit, get the correct positions then solder the parts together, holding them with alligator clips and clamps outside the model to avoid damaging the plastic. Just keep test fitting often, and also keep testing the circuit as you go to make sure your polarity is correct and your LED’s aren’t damaged.
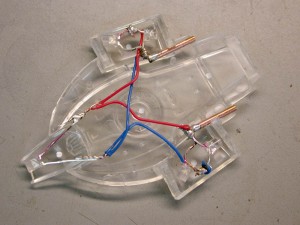
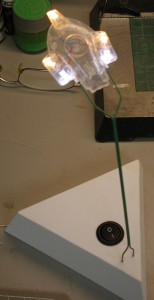
Next, you can use narrow brass or copper tube (available from K&S metals at your hobby shop) as a receptacle for the stand mount which you will make from Plastruct’s plastic coated steel wire (made in two sizes), also available at your hobby shop. Choose sizes that will allow the stripped wire to slide easily but firmly into the hollow tube. This wire will act as support for the model as well as carry electrical current to the LED’s. The plastic insulation on the wire will allow you to glue it together and prevent short circuits. The tiny tubes will allow you to remove the model from the stand any time you wish. Solder the LED’s to these tubes with one for the positive leads, the other for the negative. You will need to drill holes and cut channels into the interior of the model to accept the tubes. See Fig. 1.
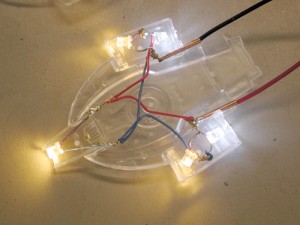
When you are satisfied with your internal assembly, make sure you fully test it by plugging in some wires from your battery pack before gluing the hull together, sealing it up forever. See Fig. 2.
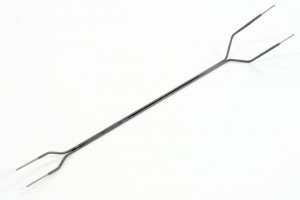
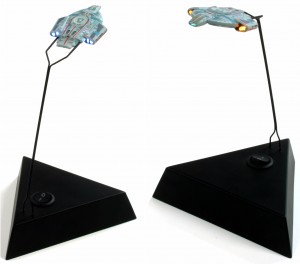
Now is a good time to make your stand. First, make your support by stripping and preparing the plastic coated wire, bend it into the shape shown and make sure the stripped ends fit into the model snugly but easily without strain on any parts as in Fig. 3
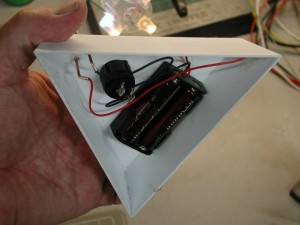
The stand shown in these pictures was scratch built from sheet plastic, but you can make one out of just about any kind of box you want. A switch is installed as well as a battery pack to hold two dry cells and two tubes, the same as the ones installed in the model, are used to plug the support wires into. See Fig.4.
Imagine what you’d have to go through to light this little fella up if it were molded in opaque material!
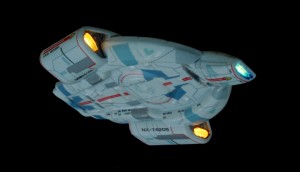
When you are satisfied everything can be mounted in place and the hull can be glued together, test everything (Fig. 5) then go ahead and finish the model as usual but with the following exceptions:
1: Mask off the areas you want to light up, OR be prepared to scrape paint off those areas when the model is finished. Liquid masking film is handy for this operation. Note the stand you made can be used to hold the model when spraying it as well as keep paint from getting into the inside of the tube!
2: Spray the entire model’s outer surface with white primer and when dry, follow up with dark gray primer. The white will help the light bounce around more inside the model to light up other things like windows, the gray primer will help keep the light from leaking through the hull colour, as most other paints are not entirely light-tight. Continually test the lighting while priming to make sure the model’s hull is sealed. Silver also makes for a great light blocking alternative as well, just make sure you can paint over the silver with your hull colour. Some silver paints don’t take well to being re coated with another colour.
When that is done, finish and decorate the model as desired. Install the batteries, plug in the stand, throw the switch and… (Fig 6)… ENGAGE!
Get yours now from the Autoworldstore.com
http://www.autoworldstore.com/SearchResults.asp?Search=AMT751&Submit=Search
Drag Racing’s Legendary past is a classic story in any scale
In any sport there is period of time you can look at and pinpoint the moment when the sport hit the big time. For drag racing, it was the late 1960s into the mid 1970s. That was when the sport experienced the perfect combination of extraordinary technological breakthroughs, record-breaking speeds, ground-breaking designs and a collection of legendary characters who were always ready to push the limits. It was that intoxicating mixture which took drag racing from a regional sport to one that captured the imagination of the nation.
In the late 1960s, model kit building was an extremely popular hobby. Millions of model kits were manufactured each year to keep up with the demand. Model Products Corporation (MPC), a fledgling model kit company based in Michigan, took notice of America’s attention to drag racing and began to produce 1:25 scale model kits of these cars. Everything from funny cars and rail dragsters to pro stockers and gassers lined store shelves. Names like “Grumpy Jenkins,” “Mr. Norm” and “Dyno Don” adorned the packaging. AMT, Monogram and Revell also produced drag racing models kits, but by the 1980s, model building began to wane and the tooling for most of these models was put into storage.
Today, vintage drag racing subject matter has become extremely popular in model kit and die cast circles. Many famous cars have been produced over the years, but it wasn’t until May of 2012 when Round 2, LLC announced the launch of their “Legends of the Quarter Mile” program that things really heated up. The Legends line was conceived to put a spotlight on the famous names and cars that put drag racing on the national map. Because of the diverse brands and categories under the Round 2 umbrella, “Legends” 1:18 scale die-cast replicas and 1:64 scale slot cars and drag sets are manufactured under the Auto World brand. Vintage model kits are also being reintroduced in 1:25 scale under the MPC and AMT brands.
The release of Harry Schmidt’s Blue Max Mustang Funny Car as a 1:18 scale replica signaled the beginning of a wildly successful program that has captured accolades from racing fans and hobbyists alike. Several original teams and drivers have contacted Round 2, asking to have their cars immortalized in this exciting series!
It was well before the first release, when work began to reintroduce several of the most popular drag racing model kits ever made under the “Legends” line. Some had been unavailable for decades and had been commanding big money on the collector market. The original tooling had to be scrutinized and in many cases, parts recreated. The artwork used to produce the decals in the original kits was long gone. Archival photos and other reference material was used to freshly replicate all the logos, badging and other markings in creating new, more detailed and accurate decal sheets. It was a challenge to find several of the original drivers. Some had moved on to other businesses and others had unfortunately passed away.
Late in 2012, Round 2’s MPC brand reissued Arnie Beswick’s “The Super Judge” GTO and Connie Kalitta’s Bounty Hunter Funny Car model kits in the Legends of the Quarter Mile program. These deluxe 1:25 kits are available for the first time in decades and have additional extras added, like the additional window parts in the Beswick GTO molded in clear orange, replicating the real car’s tinted backlight. You’ll notice the attention to detail with the kits’ extremely popular pad-printed tire lettering and a connection to the past with the vintage box artwork.
The latest Legends model kits include a special edition of AMT’s Ohio George Montgomery 1933 Willys Gasser and Carl Casper’s famed Young American front engine rail dragster, complete with bonus items and packaging that will delight any modeler or kit collector. For the Young American, Round 2 worked with Carl Casper himself to acquire a fantastic photo of the 1:1 car doing a wild pre-run burnout, to use on the packaging. It was a photo taken only seconds after the original one was used on the original release of the kit back in the 1970s. MPC’s team turned another photo Carl provided into a bonus card to include in the kit, featuring the specs of the car and a list of famous wins.
For the latest Legends of the Quarter Mile news, updates and offers, check out www.autoworldhobby.com/Legends. Get Legends of the Quarter Mile products at hobby stores, racing and die-cast related stores and www.autoworldstore.com.
Round 2 Models: 1:350 TOS U.S.S. Enterprise Electronics
We were proud to finally release the 1:350 scale ST:TOS U.S.S. Enterprise late last year. Expecting that many modelers would want to take their kit to the next level by installing lights, we offered two products featuring a light kit specifically engineered for the kit, MKA005 Deluxe Accessory Set and MKA007 Light Kit. Offer this kind of product was a first for us, and a few hiccups have been reported along the way. The primary complaint has been about the round PCB boards that go inside the Bussard collectors. We would like to take this time to review the problems and solutions.
Problem #1- Round (Bussard) PCB boards either fail from the beginning or perform correctly initially, but fail in whole or in part soon after.
We apologize for any frustration this might have caused. All boards were tested twice before being packed to ensure all lights came on and worked properly. Due to all of the possible variables, it has been difficult to diagnose the source of the problem. We have not been able to reproduce these results in our own testing. With this in mind, we will honor requests to replace the boards through our normal part replacement service via the link located at the bottom of our website. In addition to the proof of purchase, we are asking for all failing boards to be returned when sending your replacement form. These faulty boards will be returned to our factory for further examination.
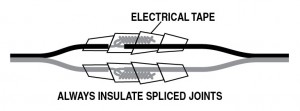
If you have not yet assembled your kit and installed the light kit, please keep this in mind. The heat shrink casing mentioned in the instructions of the light kits was omitted by the factory. We will mail this to anyone that requests it, but common electrical tape (or wire nuts or any other common electrical wire insulating method) can be used. In all cases, be sure to properly insulate (with tape or heat shrink casing, etc.) all splices, especially those that connect the round PCBs to the rest of the system. This must be done to prevent raw wires from touching which would cause the PCB to short out. This is very important to do to ensure the lights will work once your model is complete.
Further, if you are testing the boards or system before final assembly, make sure not to let any exposed wires or un-insulated splices touch while the power is on. Failure to do this may cause the boards and/or LED bulbs to short and destroy the system.
(insert fig. 1)
Problem #2- LED bulbs installed on PCB boards stand on their leads rather than being properly mounted flush to the board. This prevents proper assembly of the Bussard collector.
We apologize for any frustration this may have caused as well. All samples reviewed up until final production showed that all bulbs were properly mounted to the boards. This was a problem that occurred during production. Though they were all inspected twice for their functionality, they impact on the assembly was not foreseen by the factory.
If the parts have not been cemented together there is an easy modification that can be made to the clear bulb parts included in the kits that will solve this problem. Simply clip off 2mm from the pin on each bulb (plastic parts 142 & 143). The remaining section of pin will be enough to cement them into part 42 and allow enough clearance to accept the extra length of the LED bulbs.
If these parts have been securely cemented together, we will either replace the bad board, or we will replace all colored clear bulbs and part 142 to allow you to make the above modification for use on your model.
(Insert fig. 2)

Lastly, We have gotten multiple complaints about two more problems with plastic kit parts in the POL880 (1:350 scale TOS Enterprise) and POL878 (Premiere Edition) kits themselves.
The most well-known is the problem with bent or warped shafts on the fan blade dome (part #140). For people building their kits without lights, this shouldn’t be a huge concern. We have replacement parts available for anyone that runs into this problem. We had the tooling modified to fix this problem as soon as we heard about it. So future production of the kit should not have the same concern.
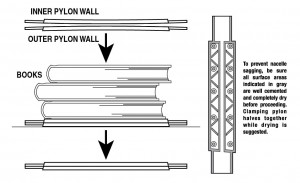
The other problem is that we have gotten several requests to replace pylon parts due to warping. However, we have not been shown examples where warping is so severe that replacement of the parts is warranted. We have found that cementing the long edges of both parts and placing these sub-assemblies under a significant weight such as a stack of books will eliminate warping in the final subassembly. Allowing the parts to dry under weight will ensure they will stay straight. If you think you have a such a significant amount of warping that you feel it can not be corrected, please use the “contact us” link on our website and we will respond to see photos of your parts to judge these extreme cases.
(insert fig. 3)
For anyone finding a problem with their kit (be it the 1:350 Enterprise or any other kit we offer) please note the part replacement guidelines on our website. Replacement part requests are addressed almost daily, and they are usually shipped within two weeks or less.
http://www.round2models.com/replacement/
Let the Kat out of the box!
What could be better in the winter months than enjoying time at your modeling workbench, jammin’ on your latest and greatest build? Finding a Katch the Kat version of AMT’s upcoming “Sock It To Me” 1962 Chevrolet Corvette kit, that’s what! The Kats are at it again, getting ready to reissue a perennial favorite kit, in the most desirable format ever seen in its history: SOCK IT TO ME! Back in the day, the original AMT Kats cleverly created issues of select kits named after popular catch phrases of the time. The “Sock It To Me” ’62 ‘Vette oozed additional coolness, with it’s psychedelic “airbrushed and pinstriped” box artwork and fluorescent orange lettering.
The FOUR different mod car illustrations on the box made you want to build one, or more, “real bad!” As a special bonus, inside the kit was a bonus Sock It To Me bonus sticker, printed with day-glo ink. The model could be built as a sporty stock replica, but also included a myriad of performance parts to create several different inspiring custom and racing variants: a blown quarter miler, a DOUBLE-blown salt flats rocket, or a totally mod custom with mind-blowing pinstripe and flame decals! Dig? Dig!! When the Kats decided to reissue the kit in the SITM packaging, they went all out, making sure it was just as sweet as the original… even better! They’ve included pad-printed “pie crust” M&H Racemaster slicks along with “wide whitewall” Firestone Deluxe Champion tires. They even restored the vintage slotted Astro mags back to their original appearance by adding back the textured center sections, for the ultimate in retro realism. The super-colorful decal sheet has been completely recreated from scratch, and we think you’ll agree, they are beautifully brighter than the originals! The Kats like the feature-packed ’62 Vette kit so much, they’ve decided to include it in the exclusive “Katch the Kat” program. Just like the Meyers Manx and Grandpa Munsters’ Drag-U-La, one in every twelve Sock It To Me ’62 Vette kits is molded in a special metallic color. Every metallic kit includes a confirmation card inside the box to let you know you’ve found something special! This time, and in keeping with the groovy box art, the metallic color is far-out orange! But every kit, whether it’s molded in white or metallic orange, includes a reproduction bonus “Sock It To Me” sticker, just like the original. It’s fabulous fun – only from the Kats at AMT!
Buick Opel continues the new models in color choices
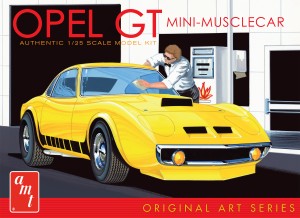
Round 2 is offering several popular 1:25 scale models in 2 colors. The series began with the Silver Screen edition 1957 Plymouth Belvedere – “Christine” available in Red or White. The newest release is the AMT Buick Opel molded in your choice of White or Yellow. Includes 9×12 frameable print, large format Original Art Series packaging featuring vintage painting from AMT archives, all new and expanded decal sheets, and 3 hood options allow for the car to be built drag, custom, or stock. Be sure to watch for the final car in this series a ’67 Shelby in Black or White.
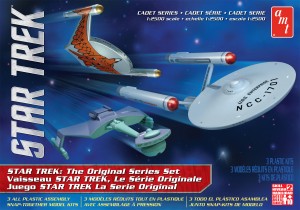
Star Trek: The Original Series Cadet Series 3-ship set
This iconic set of three 1:2500 Scale Star Trek models is a great way to pass the
snowy winter days. It includes three mini snap kits, featuring the U.S.S.
Enterprise along with the newly tooled Romulan Bird-of-Prey and Klingon D7
Battle Cruiser. Molded in silver and green the Romulan Bird-of-Prey and Klingon
D7 Battle Cruiser have never before available at this scale. These simple snap
assembly kits are great for beginners and include detailed decal sheets
featuring all three ships’ markings.
Polar Lights model kits: Clawing our way to the top
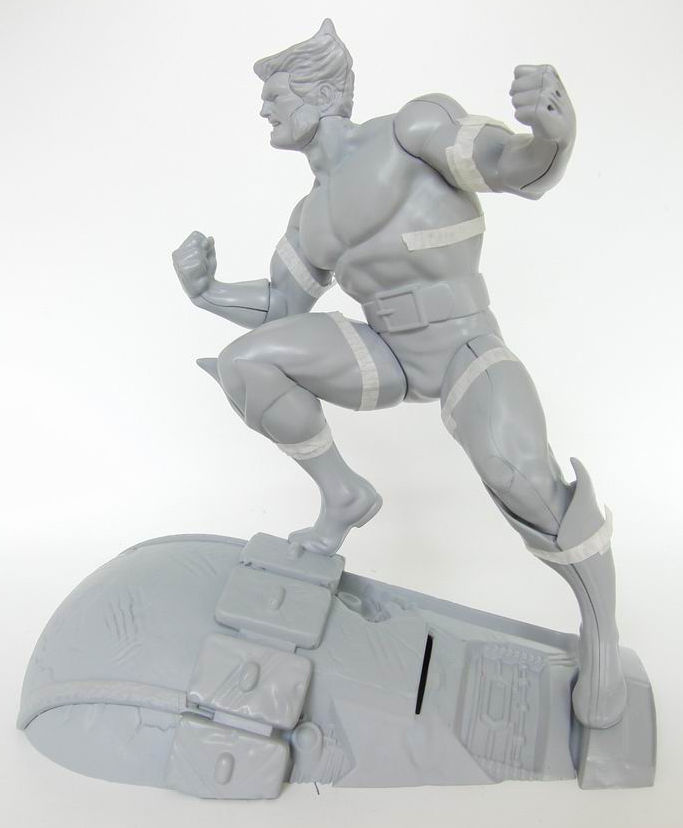
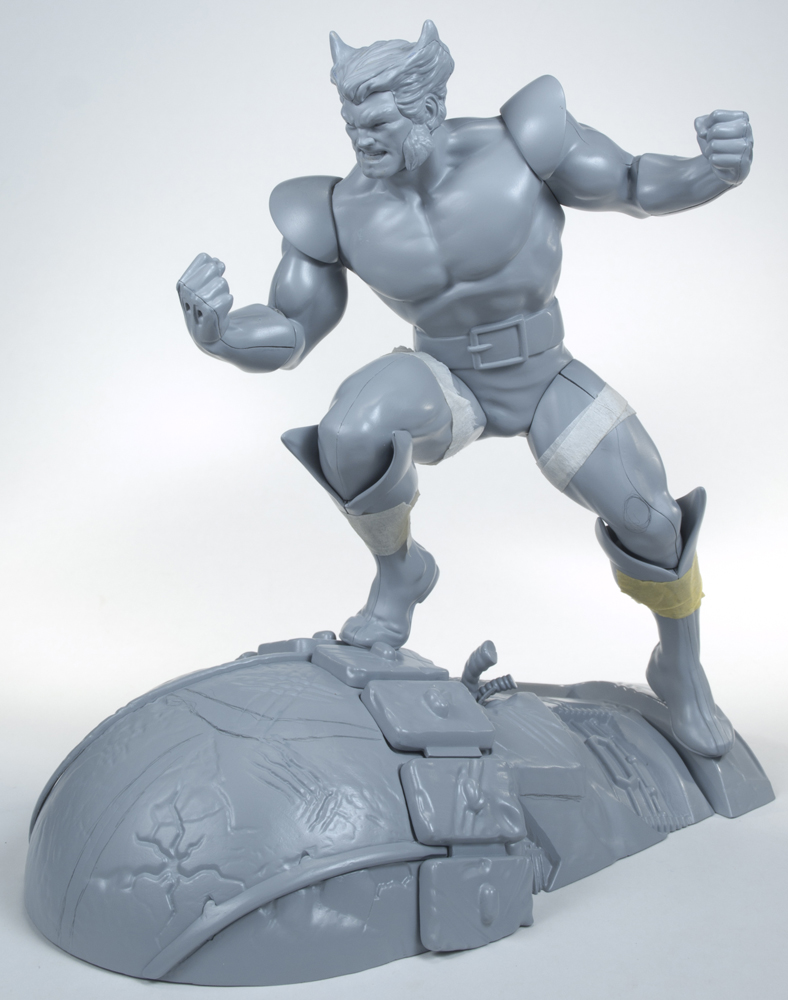
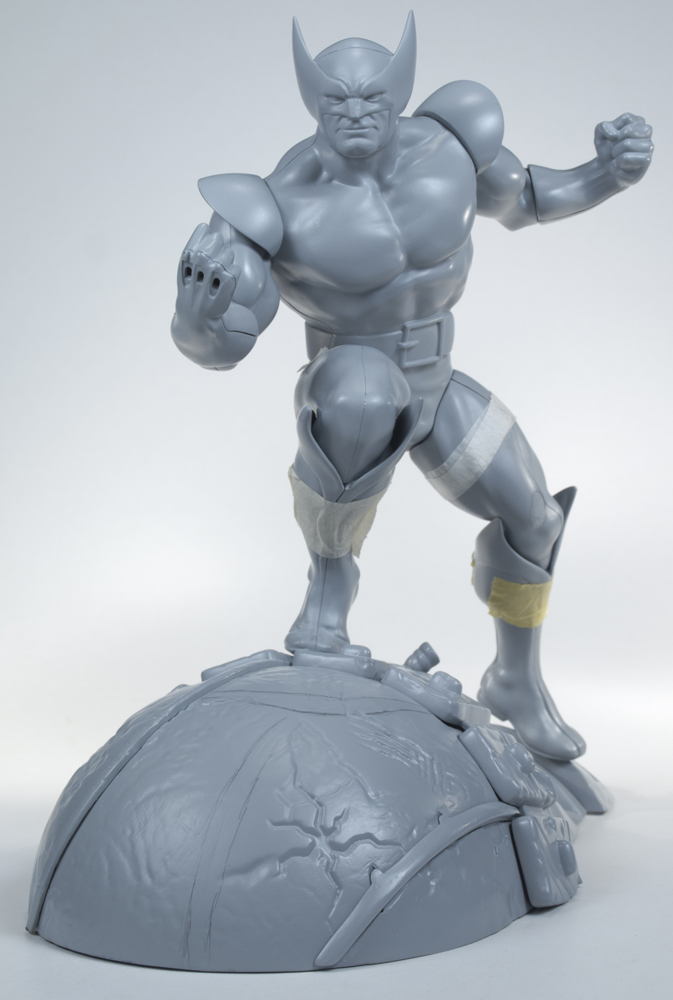
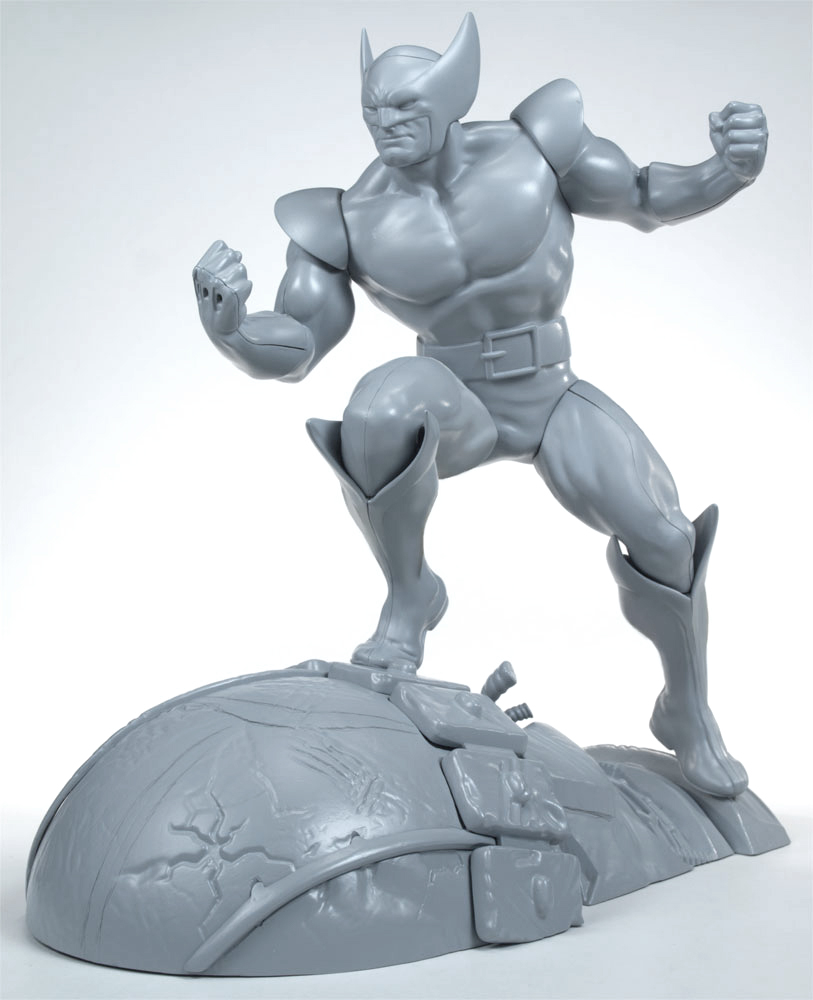
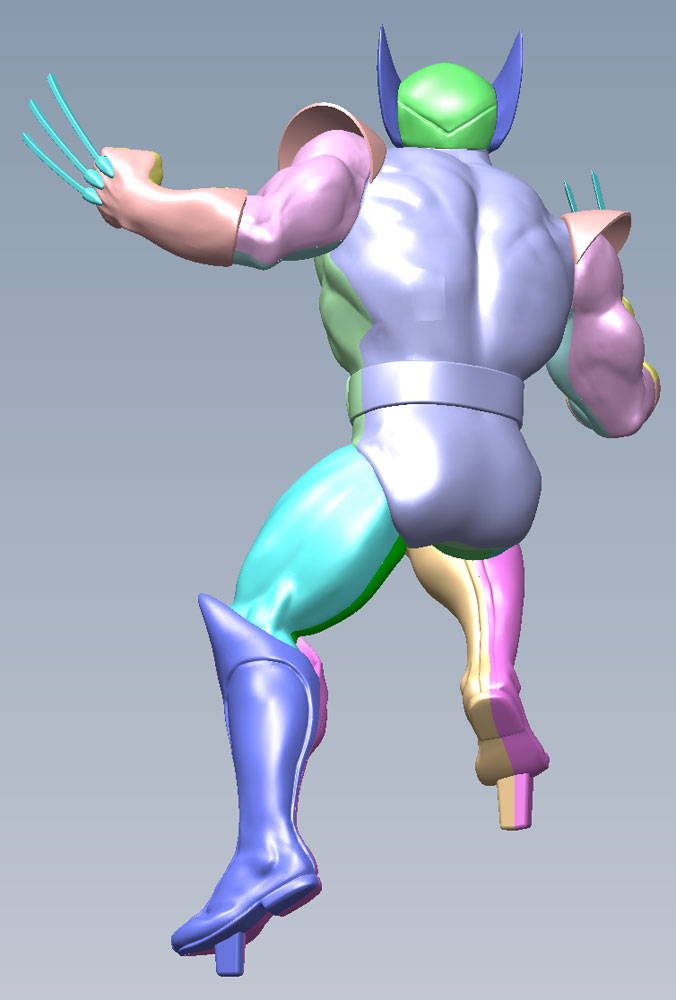
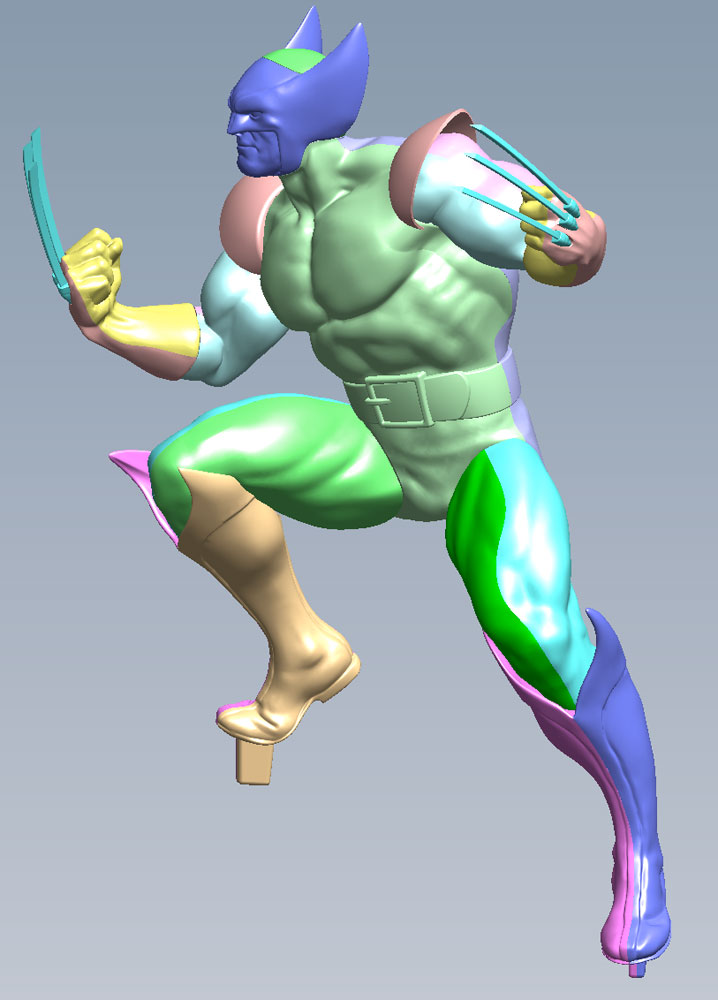
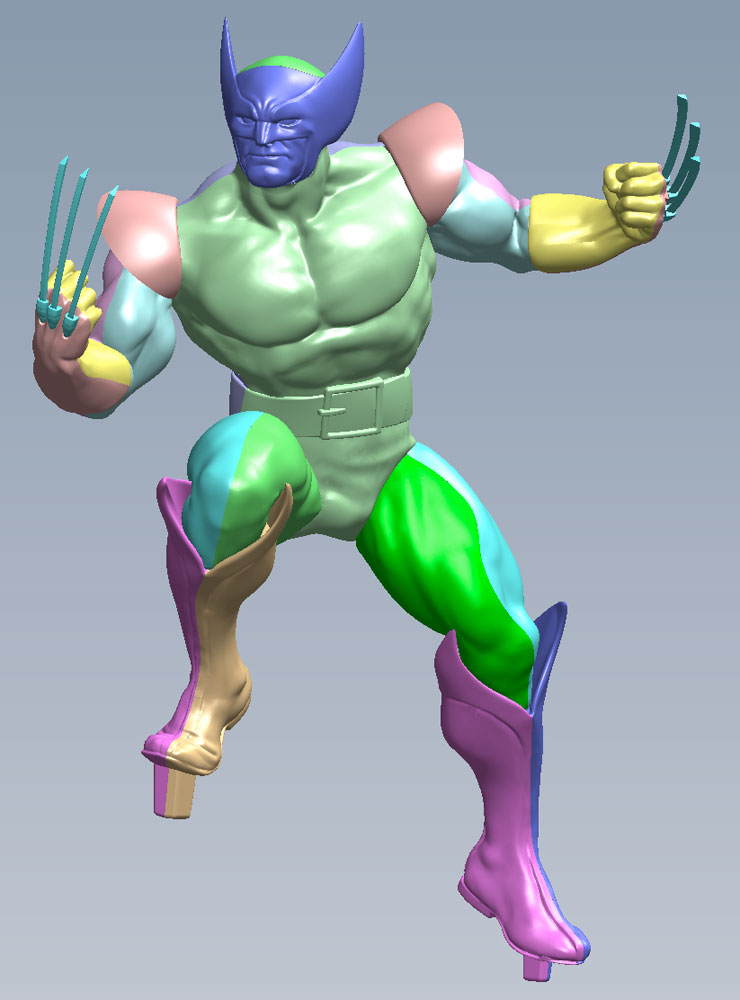
A few months back I showed the initial sculpts for our upcoming Marvel Comics Wolverine model kit. That covered the digital work done to create the basis of the model. This report shows the next steps- the factory digital file work and mockup of the kit parts.
Once the digital sculpt was done, the model was processed and we had a rapid prototype built for Wonderfest. We then sent both the files and prototype to the factory. They made the decision to use the digital files for the figure and the prototype to create the base. I am guess thing they went this route because the base looked more… irregular in that it was a mechanical object that had been battle damaged. With some “artifacts” in the RP, it looked even more beaten that we had intended.
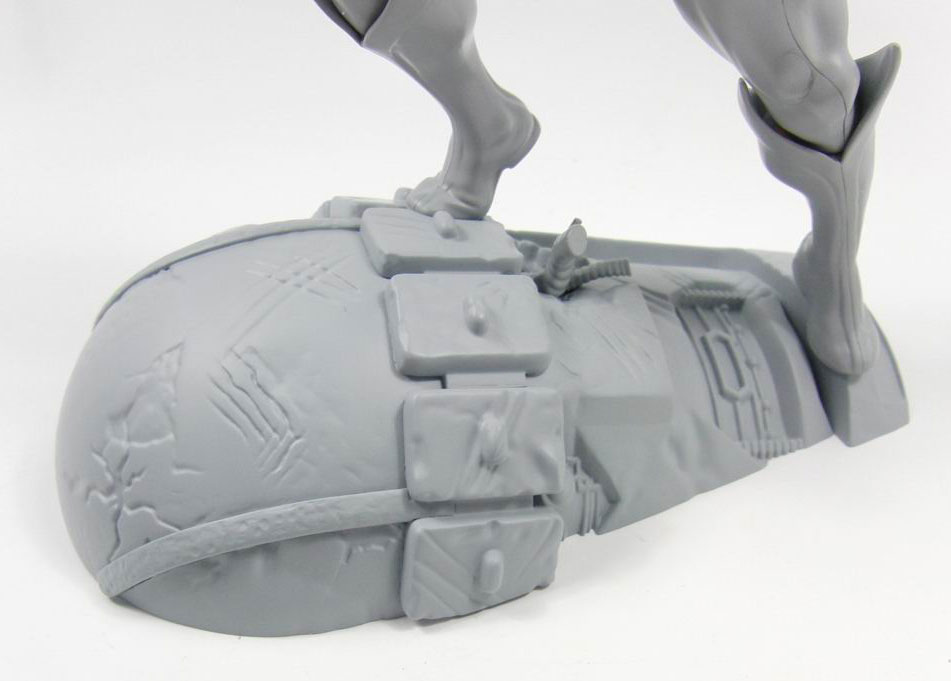
Sculpting for injection molding and for a rapid prototype or resin casting are different animals in that we can’t necessarily capture every single detail of the sculpt. A certain amount of revision needs to be made to alleviate mold-trapping problems. Another hurdle is that the person making the mockup is not an artist trained in understanding human anatomy. They don’t realize that shaving a bump off here or moving one there might be cause for concern. In the images of the mockup you can see a few spots where I circled a spot on his leg where they had shaved a muscle off to fix a trapping problem. Not the best solution, but that is why we do the mockup. This is the stage where all of these kinds of problems get worked out.
The colorful images shown are images captured from the factory’s digital mockup. With these files, I can explore the model by hiding or showing the parts and examining cross-section views. It allows me to turn it to virtually any angle. This gives me a clear idea of what to expect in the model.
Once the digital 3D file is settled, the next stage is to make a full-blown mockup of the kit. This represents every aspect of the kit from size to assembly. There are always little things to tweak and change up. This kit was no different. Probably the biggest adjustment we made was to raise the angle of the head up a few degrees to keep him looking eye to eye with the viewer.
We should have some test shots of the kit around Christmas. I’ll be sure to post pics of that when I can.


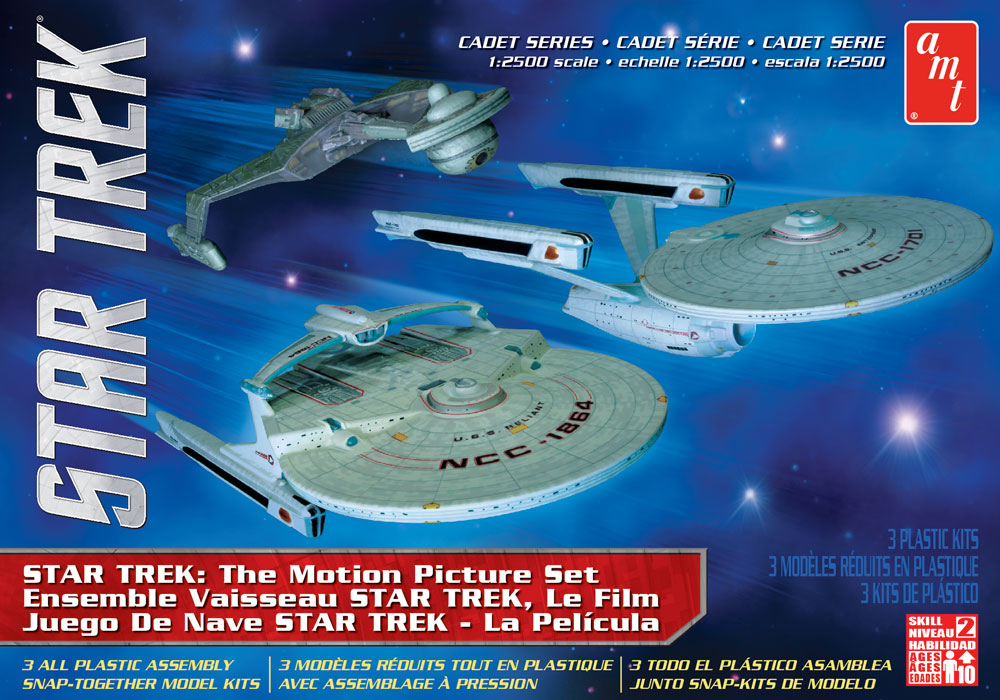
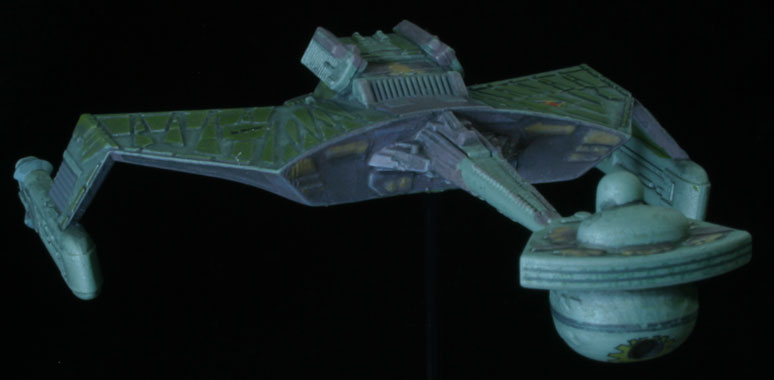
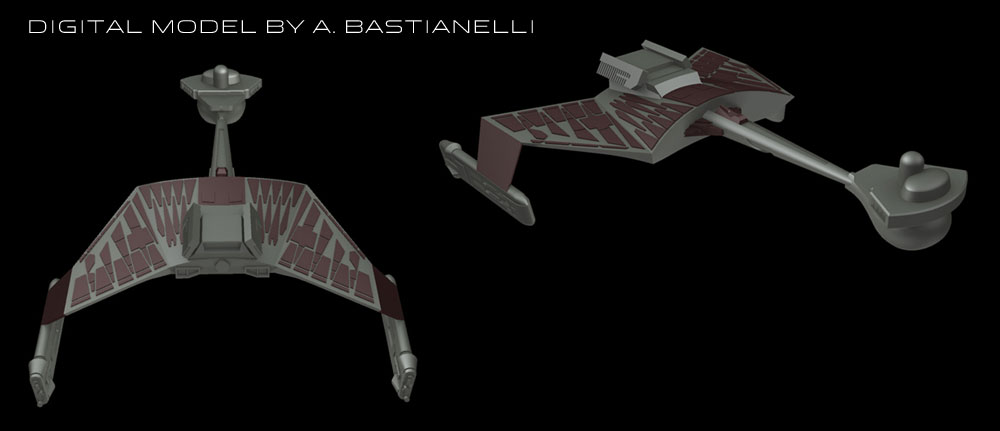
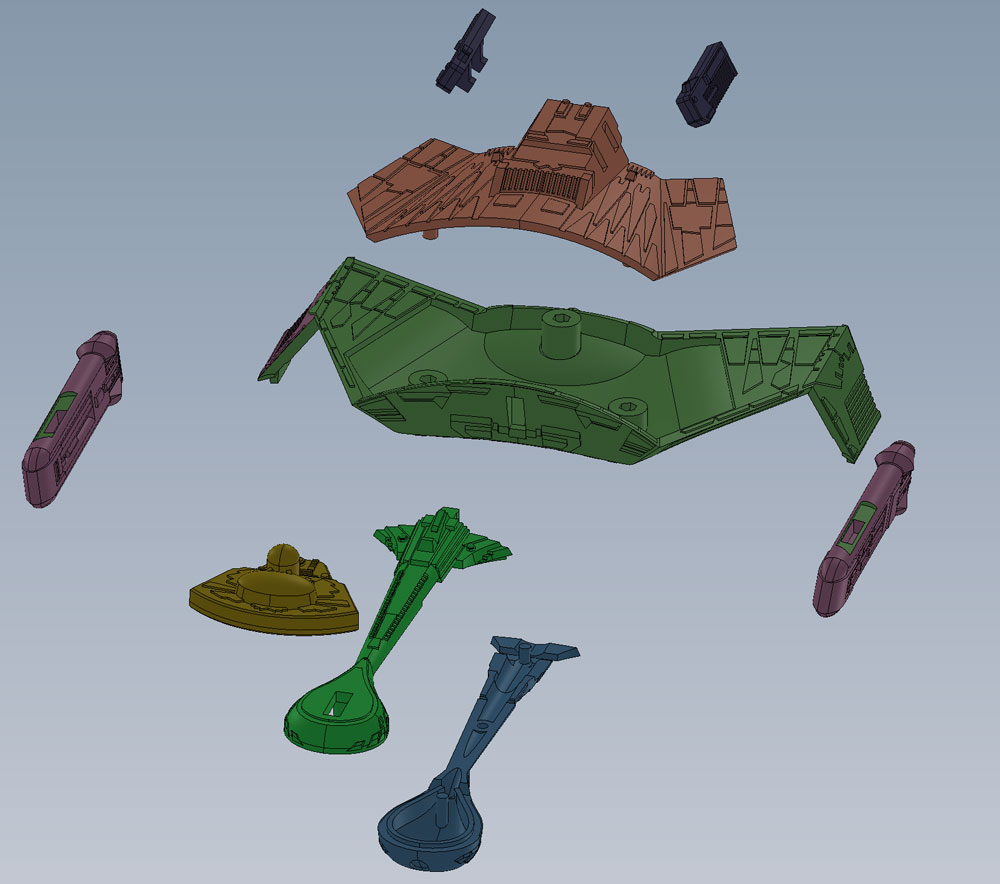
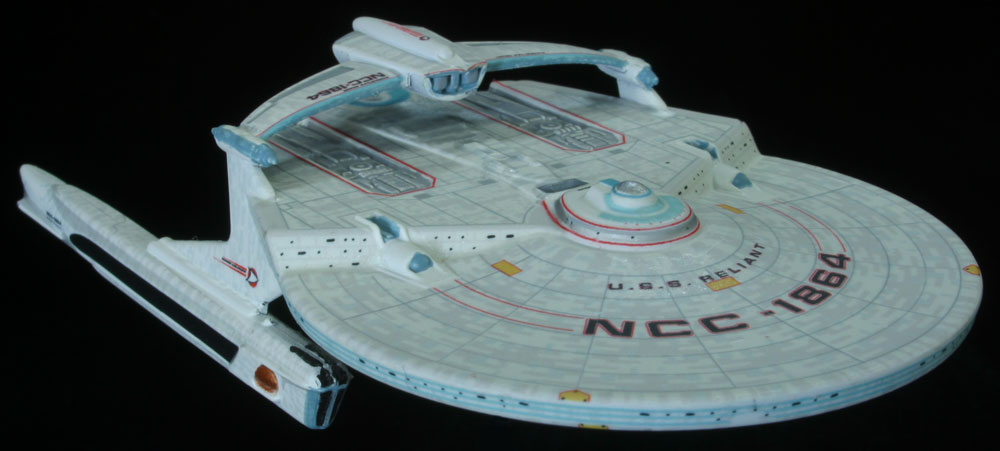
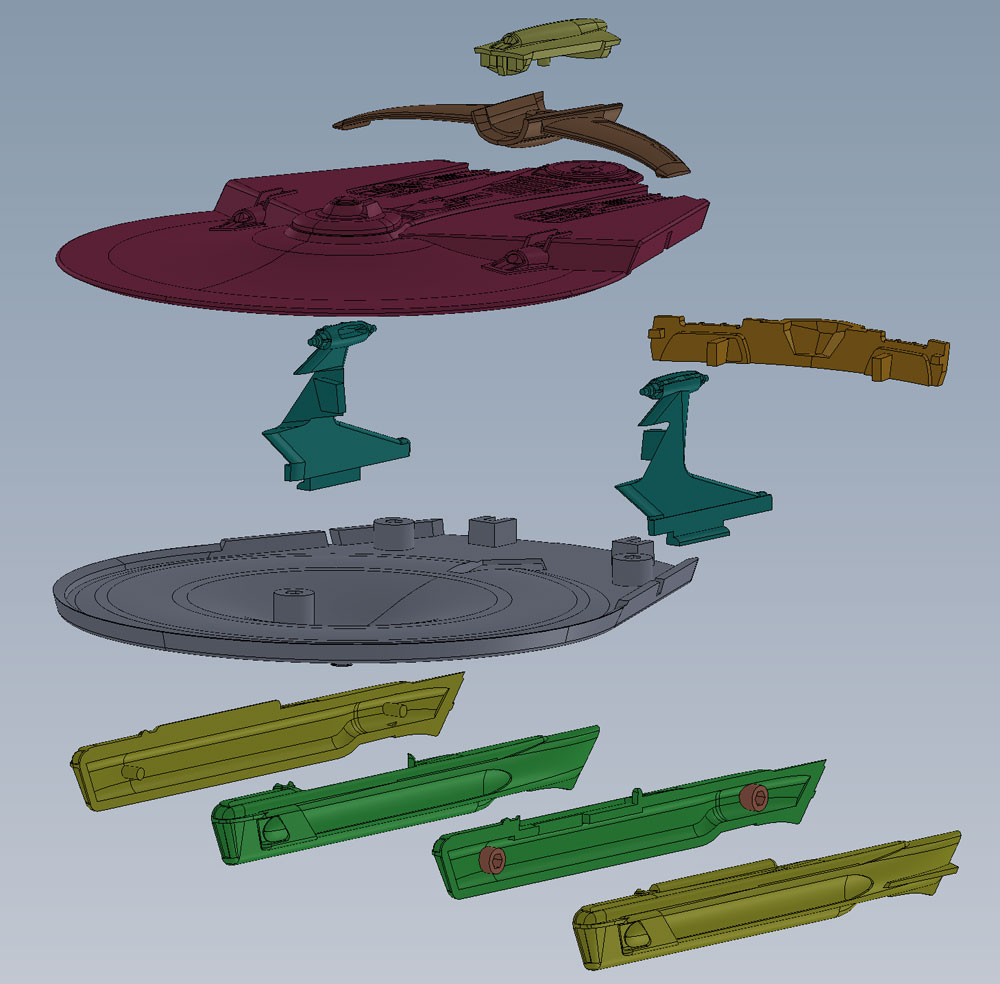
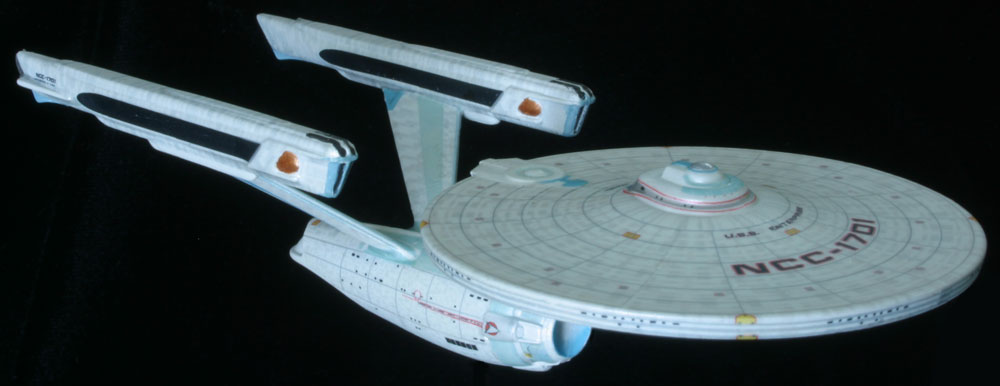
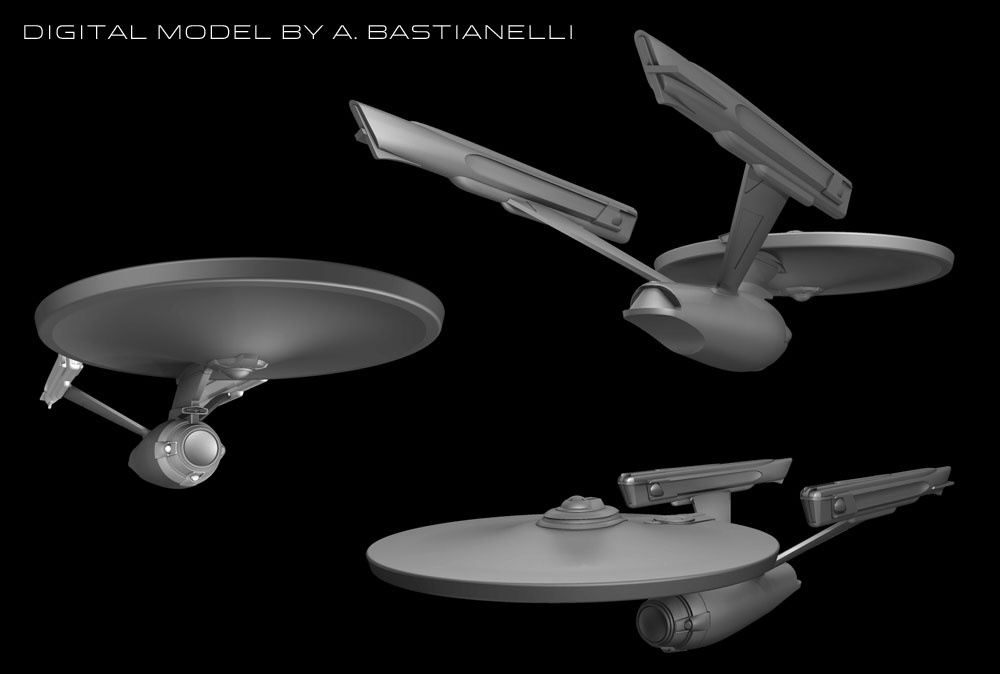
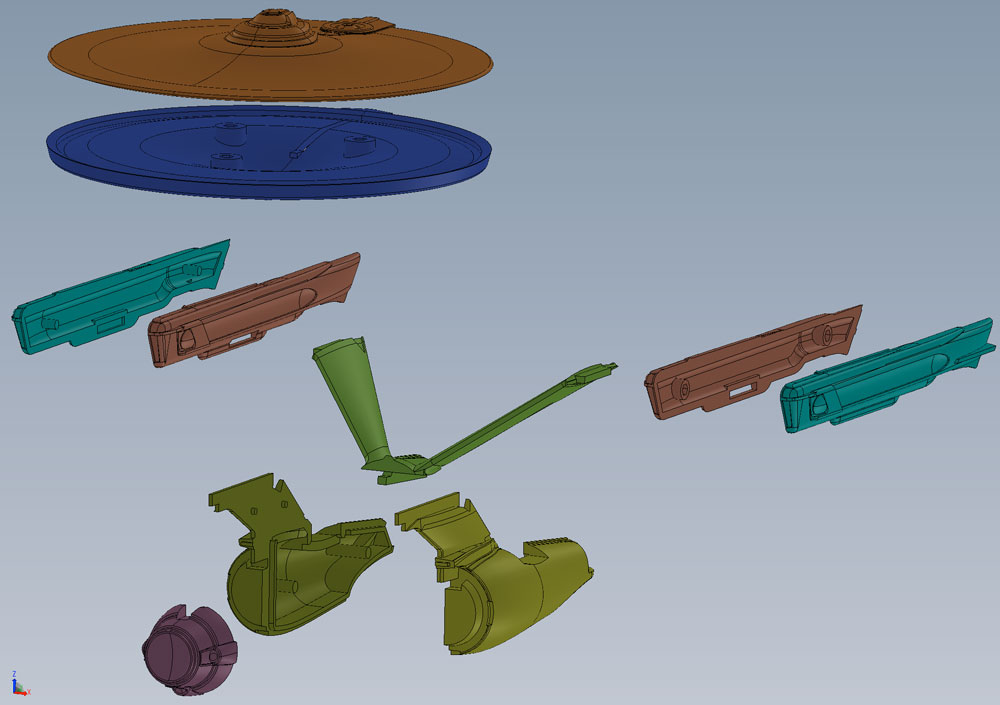
Star Trek Models: TMP Cadet Series
With the huge deal the big Enterprise has been, I don’t want to gloss over a few cool kits that might not measure up… (badumpump kish!) As mentioned back at Wonderfest, we are bringing out a new Star Trek: The Motion Picture Cadet Series set which includes a newly tooled U.S.S. Enterprise Refit, U.S.S. Reliant and Klingon K’t’inga Battle Cruiser all in 1:2500 scale. I want to take a minute to give these little kits their due.
We had Angelo Bastianelli do the computer work on these to get us started. I worked with him to noodle out all of the details to get everything just right. Those files were sent to the factory where they were adjusted for production and parted out. We received test shots a few months back and we have had a few rounds of adjustments to get all of the parts to snap perfectly. As you can see by Jim Small’s work on our buildups, the ships came out great. As usual, the kits come with all the decals you will need to get al of the paneling details on the Enterprise and Reliant. Look for the kits to hit store shelves right at the turn of the New Year and keep an eye out for a TOS Cadet set in 2013 (more details on that later).

Round 2 Models: Alien

I’m not going to say much in this post. I’ll let the image speak for itself for a while.
We will have more news on the Alien license at Wonderfest. Feel free to speculate until then. 🙂
Polar Lights Model kits: Wolverine model kit development

I’ve said many times before I’m a lifelong comic book collector. As a young kid, I was into the standard Superman, Batman and Spider-Man fare. I loved team books like the Justice League of America and the Avengers. If I already had the current issue of my favorite solo characters, I’d buy the book that had the most costumed heroes in it. As I grew older, I started actually READING the books instead of just looking at the pretty pictures. One day I stumbled across a comic I hadn’t eve noticed before and picked up X-men #136. My fellow readers can probably tell you that this was at the point where the X-men were growing in popularity among readers due to the classic work of writer Chris Claremont and artist John Byrne whose run on the title was building to a crescendo. No one outside of comics really knew about the X-men. They could point out Superman or the Hulk, but they wouldn’t be able to tell you who Colossus was. This issue hooked me and I loved every character in the book. A few years later Wolverine was got the spotlight treatment in his own mini-series and the story presented him as a deep, but savage and ruthless character. Over time, the X-men and especially Wolverine continued to grow in popularity until the rest of the world caught on. I still read Wolverine and X-men comics and they are all in incredibly different places now, but some of my fondest comic book memories are of the guy that claimed, “I’m the best there is at what I do… but what I do isn’t very nice…”
So it was with those fond memories in mind that I began our Polar Lights Wolverine model kit development. I wanted to keep him in his 70’s/80’s era look and landed on the yellow version of the suit mainly because that’s the one he started gaining popularity in. I also figured that anyone wanting to see a later version costume could omit the shoulder cuffs and with a little putty filling and sanding could make the brown suit version or with further mods create a more contemporary look. My goal was to make a great looking kit in his classic costume and keep it in reach to make any other version a modeler might want.
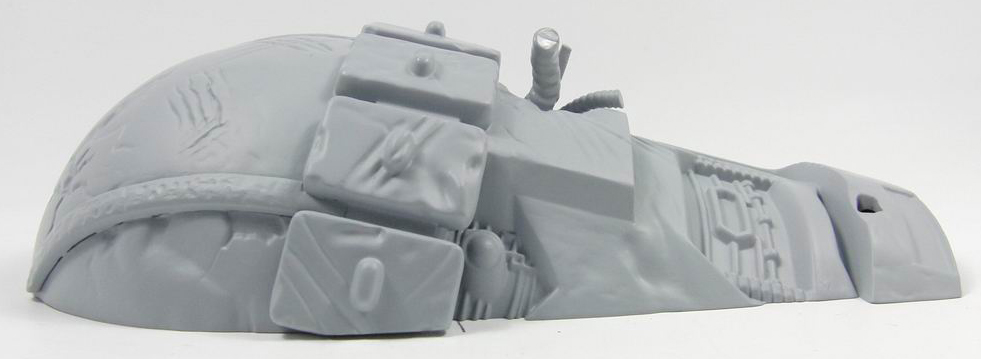
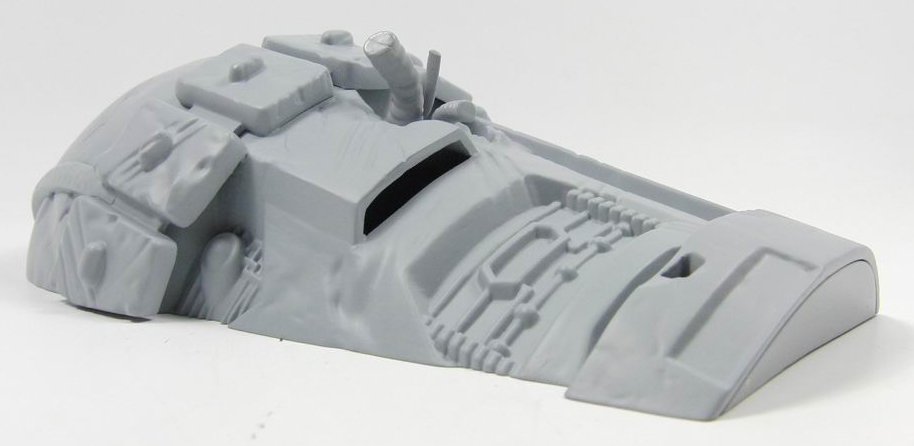
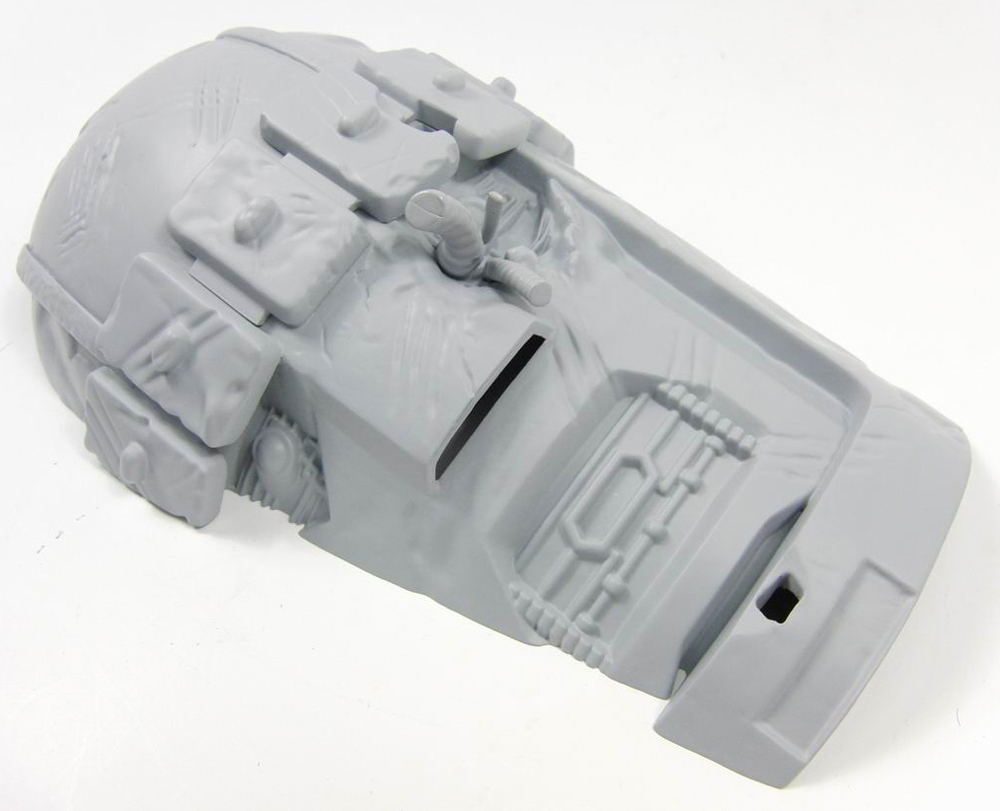
For the base, I originally considered making it out of a mass of dead Hellfire Club goons or ninjas. I felt ninjas would, by design, cause too many trapping problems on the tool. After thinking about how much more it would probably costs to sculpt several figures lying in a pile, I abandoned the Hellfire Club goons pretty quickly. Besides as villains, they weren’t terribly recognizable by anyone but longtime X-men fans. I landed on doing a Sentinel head. Even though they aren’t considered Wolverine’s arch foe, they were the villains in the classic “Days of Future Past” storyline in the Claremont/Byrne run in which Wolverine played a key roll. They would return to battle the X-men on several occasions. Besides, robots are cool and anyone who isn’t a die-hard would accept it as a normal occurrence for Wolverine to have taken down a big one.

So here I show my original control drawing of the model. I wanted to capture a pose with plenty of movement for plenty of great views in the round. It was important for m to have the Sentinel look like he had lost a fight and supply plenty of room for additional detail in the eyes, mouth and other wounds. (I can’t wait to see someone add some fiber optic spark effects) We’ll be including the unmasked head, but the second set of claws has gone by the wayside.
We hired Erick Sosa to sculpt the kit for us. If you are familiar with the many licensed resin statue products on the market, you may know his work. He has sculpted some great ones including iconic Punisher and Deadpool figures. Erick sculpts digitally in Zbrush and works on the look of the figure before posing it. This shows his initial sculpt which I deemed to be too contemporary for what I intended for this kit. The look of the character was too close to how we see him in comics today rather than his “bronze age” appearance. I wanted to stylize him slightly to make him look more like a character from a comic book rather than a real guy in a suit. We had to weigh the realism we can achieve today with the flavor of an Aurora-style figure. I think we ended up striking the perfect balance.


Here is a look at the Sentinel head before getting battle damaged. Figuring out the “waterline” was no easy task. As with all comics, the drawing allows any number of cheats, but translating it into real life gets tricky. I had designed it with an exact angle in mind that would result in a clean pull from the steel tooling. Conceptually, besides the rectangular shapes around his head and the structural damage protruding from the eye socket, it could be made as one piece. Whether or not this will be the case remains to be seen.

A look at the sculpt and images of the factory’s digital mockup next time…